
On this page
You built the form. It works, the questions are good and the thank-you screen is friendly. Now it needs to live on your site, where people actually are. This guide shows how to add a form to a website three ways: a link, an embed in the page, or a popup on top of it.
You'll get the code for each embed mode and a plain guide to where it goes. One choice quietly decides whether your campaign data survives: the embed script or a bare iframe. There's a short section on Google Forms too, a mobile test plan, and a free two-page embed code cheat sheet to keep next to your keyboard.
Still building the form itself? Start with how to create an online form, then come back here to put it on a page. Starting from a Word file or a PDF? Here's how to make a fillable form from it.
Three ways to add a form to a website: link, embed or popup#
Before you copy any code, decide how the form should meet your visitors. There are three broad ways to add a form to a website, and each one fits a different job.
| Way | What visitors see | Best for |
|---|---|---|
| Link | A button or text link that opens the form on its own page | Emails, social posts, chat messages, QR codes on posters |
| Embed | The form sits inside your page, like any other section | Contact pages, quote requests, sign-up pages |
| Popup | The form opens over the page when someone clicks a button | A "Get the price guide" button, an offer after a few seconds, quick feedback |
A link is the simplest. It needs no code at all, and it's what you share anywhere outside your site. An embed keeps people on your page, which matters when the form is the whole point of the page, like a contact page. A popup keeps the page clean until someone clicks, or until the moment you pick.
Most sites use more than one. A contact page might embed the form, while a blog post opens the same form in a popup from a button. Same form, same responses, two doors in. If you're planning forms for a whole client site, our website form examples post lists the six most sites need. Want visitors to see a price as they answer? Embed a website price calculator.
Copy the embed code: inline, popup, slider or full page#
If you want to embed a form in a website page, this is the part you need. In HornetForms, every form has a Share tab that gives you the embed code. You can embed a form four ways, on every plan:
- Inline. The form sits in the page, like any other section.
- Popup. The form opens over the page when someone clicks your button, or by itself.
- Slider. A popup that slides in from the side of the screen.
- Full page. The form fills the whole page.
Here's what the inline code looks like. Yours carries your own form's slug and title:
<div data-hornetforms-embed="your-slug" data-hf-title="Contact us"></div>
<script async src="https://forms.hornetforms.com/embed.js" data-hornetforms></script>
And a popup that opens from your own button:
<button type="button" data-hornetforms-popup="your-slug" data-hf-title="Contact us">Open form</button>
<script async src="https://forms.hornetforms.com/embed.js" data-hornetforms></script>
Two lines each. The first line marks the spot. The second loads the HornetForms embed script, which finds that spot and draws the form there. Options you pick in the Share tab become extra data-hf- attributes on the first line, like data-hf-position="slider-right" for a slider.
A popup doesn't have to wait for a click. It can open by itself on page load, after a delay (0 to 600 seconds, 5 by default), when someone scrolls part of the way down (1 to 100% of the page, 50% by default) or on exit intent. You can show it once per visitor, and stop showing it after someone submits. The cheat sheet lists every popup option with its range.
Whichever mode you pick, the steps to add a form to a website stay the same: copy, paste, test. Always copy the code from the Share tab rather than typing it from a guide (this one included). The Share tab code already carries your form's slug and title.
Paste it on your site#
Where the code goes depends on your site, not on the form. You can add a form to a website built on almost anything, as long as it lets you paste HTML or add an embed block. Look for a block or widget called something like "HTML", "Custom code" or "Embed". Your site builder's help page shows where it lives.
Then:
- Add the HTML or embed block where you want the form to appear.
- Paste all of the embed code into it.
- Save or publish the page.
- Open the live page (not the editor preview) and check that the form shows up.
A few things that save time:
- Paste the whole snippet. The script line is what draws the form, so don't leave it out.
- Full page needs its own page. The full-page code comes with a note to place it as the only content of the page. Make a new, empty page for it.
- Two forms on one page work. Paste both snippets. A second copy of the script line only rescans the page.
- Publish your edits. An embed shows the published version of the form, the same as its link. Changes you haven't published stay out of the embed until you publish.
- The badge. On Free, embeds show the "Made with HornetForms" badge too, just like the form's own page. Pro and Business can remove it (see the pricing page).
Some guides skip the script and paste a bare iframe instead. The Share tab has one too, under "No JavaScript". The next section shows what it costs you.
Embed script or bare iframe: what changes#
A bare iframe is a single <iframe> tag that points at the form, with no script around it. An iframe is a window into another page. The WHATWG HTML standard defines it in one line: "The iframe element represents its content navigable" (HTML Living Standard, the iframe element, accessed 28 October 2026). The embed script shows the form inside an iframe too. The difference is the work the script does around it.
| What you need | Embed script | Bare iframe |
|---|---|---|
utm_* tags from your page's address | Passed into the form | Not passed |
Form events in your page's analytics (data-hf-track) | Yes | No |
| A Payment block in the form | The whole page goes to Stripe Checkout | Shows an "Open the payment page" button |
| Height of an inline form | Grows to fit the form | Stays at 600 px |
The UTM row is the one that bites. Say your ad links to example.com/demo?utm_source=linkedin, and the form sits on that page. With the script, the form receives utm_source=linkedin and records it, so the built-in analytics can show where each completion came from. The script passes up to 50 parameters from your page's address. With a bare iframe, the form never sees them, so every lead looks like it came from nowhere. To keep the tags next to the answers in your exports, add hidden fields named utm_source, utm_medium and utm_campaign. Our guide to capturing UTM parameters in forms covers that side.
Payments work in both. With the script, the whole browser tab moves to Stripe's Checkout page. In a bare iframe, the respondent clicks an "Open the payment page" button instead. After paying, Stripe returns people through HornetForms, not straight to your page, so set the form's redirect URL if you want them back on your site. Our event registration form with payment post walks through a full paid form.
The Share tab's "No JavaScript" iframe is 600 px tall, lazy-loaded and titled with the form's name. Keep it for sites that won't run scripts. So the rule is short: when you add a form to a website, use the embed script wherever your site allows it.
Good to know: keep the
data-hf-titlein the embed code, and give an iframe you write yourself atitle. The W3C technique for iframes explains that the title attribute "provides a label for the frame so users can determine which frame to enter and explore in detail" (W3C WCAG 2.2 Technique H64, accessed 28 October 2026). Use the form's real name, not "iframe" or "form".
How to add a Google Form to a website#
Using Google Forms instead? Google has its own embed option, and its help page gives the steps. First, publish the form: Google's page says "Before responders can access your form, you need to publish it." Then, quoting the same page:
- "Open a form in Google Forms."
- "At the top right, click More menu."
- "Select Embed HTML."
- "To copy the HTML that shows, click Copy."
- "Paste the HTML into your website or blog."
(Source: Google Docs Editors Help, "Publish & share your form with responders", accessed 28 October 2026.)
What you copy is a short piece of HTML, so it goes into an HTML or embed block, the same way as the code above. If you're weighing the two tools for a site form, our Google Forms vs HornetForms comparison sets them side by side.
Track embedded form views and submits#
Once you add a form to a website, you'll want to know whether people use it. There are three layers, and they answer different questions.
The built-in analytics (every plan). Each form's analytics show views, starts, completions and the completion rate, plus traffic sources. Because the embed script passes utm_* tags into the form, you can see completions for each UTM source, medium and campaign. The built-in analytics set no cookies and never store IP addresses.
Events on your own page (data-hf-track, every plan). Add data-hf-track to the embed code, and the script sends form events to the analytics already on your page: the Google Tag Manager data layer (dataLayer), gtag or Meta Pixel (fbq). You get four events: a view, a start, each new page and a submit. In the data layer they're called hornetforms_view, hornetforms_start, hornetforms_page and hornetforms_submit. With gtag, the start and submit become form_start and form_submit. Meta Pixel gets HornetFormsView, HornetFormsStart and its standard Lead event on submit, with no event for page changes. Your own reports can then count views and submits next to the rest of your site traffic.
The events carry only the form's slug (and the page number), never answers. The script skips them when the visitor's browser sends Global Privacy Control. They need the embed script, so a bare iframe sends nothing.
Pixels on the form's own page (Pro and Business). You can also add a GA4 measurement ID, a Google Tag Manager container or a Meta Pixel in the form's settings (Google Tag Manager needs a verified custom domain). Those run on the form's own page, the one its link opens, and never inside embeds. For an embedded form, data-hf-track is the tool.
Need the answers themselves somewhere useful? That's a separate job: Google Sheets, Slack, Discord, Notion and CSV export all work on every plan, and where your form responses can go covers each one.
Test on mobile before you share it#
Many problems after you add a form to a website show up first on a phone, so test there before you announce anything. Here's a five-minute run:
- Send a real test response from the live page. Not the editor preview. This checks the embed, the form and where responses go in one pass.
- Open the page on a phone. Open the form, popup or slider and check that your page's own sticky headers or chat buttons don't cover it. On screens narrower than 640 px, popups and sliders open as a full-width sheet from the bottom, 90% of the screen height. Exit intent is skipped on touch devices, so give phone visitors a button too.
- Zoom in. W3C's Reflow rule (WCAG 2.2, 1.4.10) asks that content works "without requiring scrolling in two dimensions" at "a width equivalent to 320 CSS pixels" (WCAG 2.2, accessed 28 October 2026). Squeeze your browser window narrow, or zoom to 400%, and make sure the form doesn't sit in a box that needs sideways scrolling.
- Use a keyboard. Tab to the form and through it. If you use a popup, open it and press Escape to close it. Our accessible forms checklist has more checks like this one.
- Test the tags. Open the page with
?utm_source=testat the end of the address, send a response and check that yourutm_sourcehidden field filled in.
Also check who hears about new responses. Notifications start off, so turn on an email to yourself for each new response if you want one. And with unlimited responses within fair use on every plan, a busy launch week won't lock the form. Here's why response limits bite on other tools.
If you'd rather write the form markup yourself, our HTML form generator post covers hand-written forms and when an embed is the easier road.
Embed code cheat sheet#
The free embed code cheat sheet (PDF, US Letter) puts the main ways to add a form to a website on two pages. It also comes in A4.
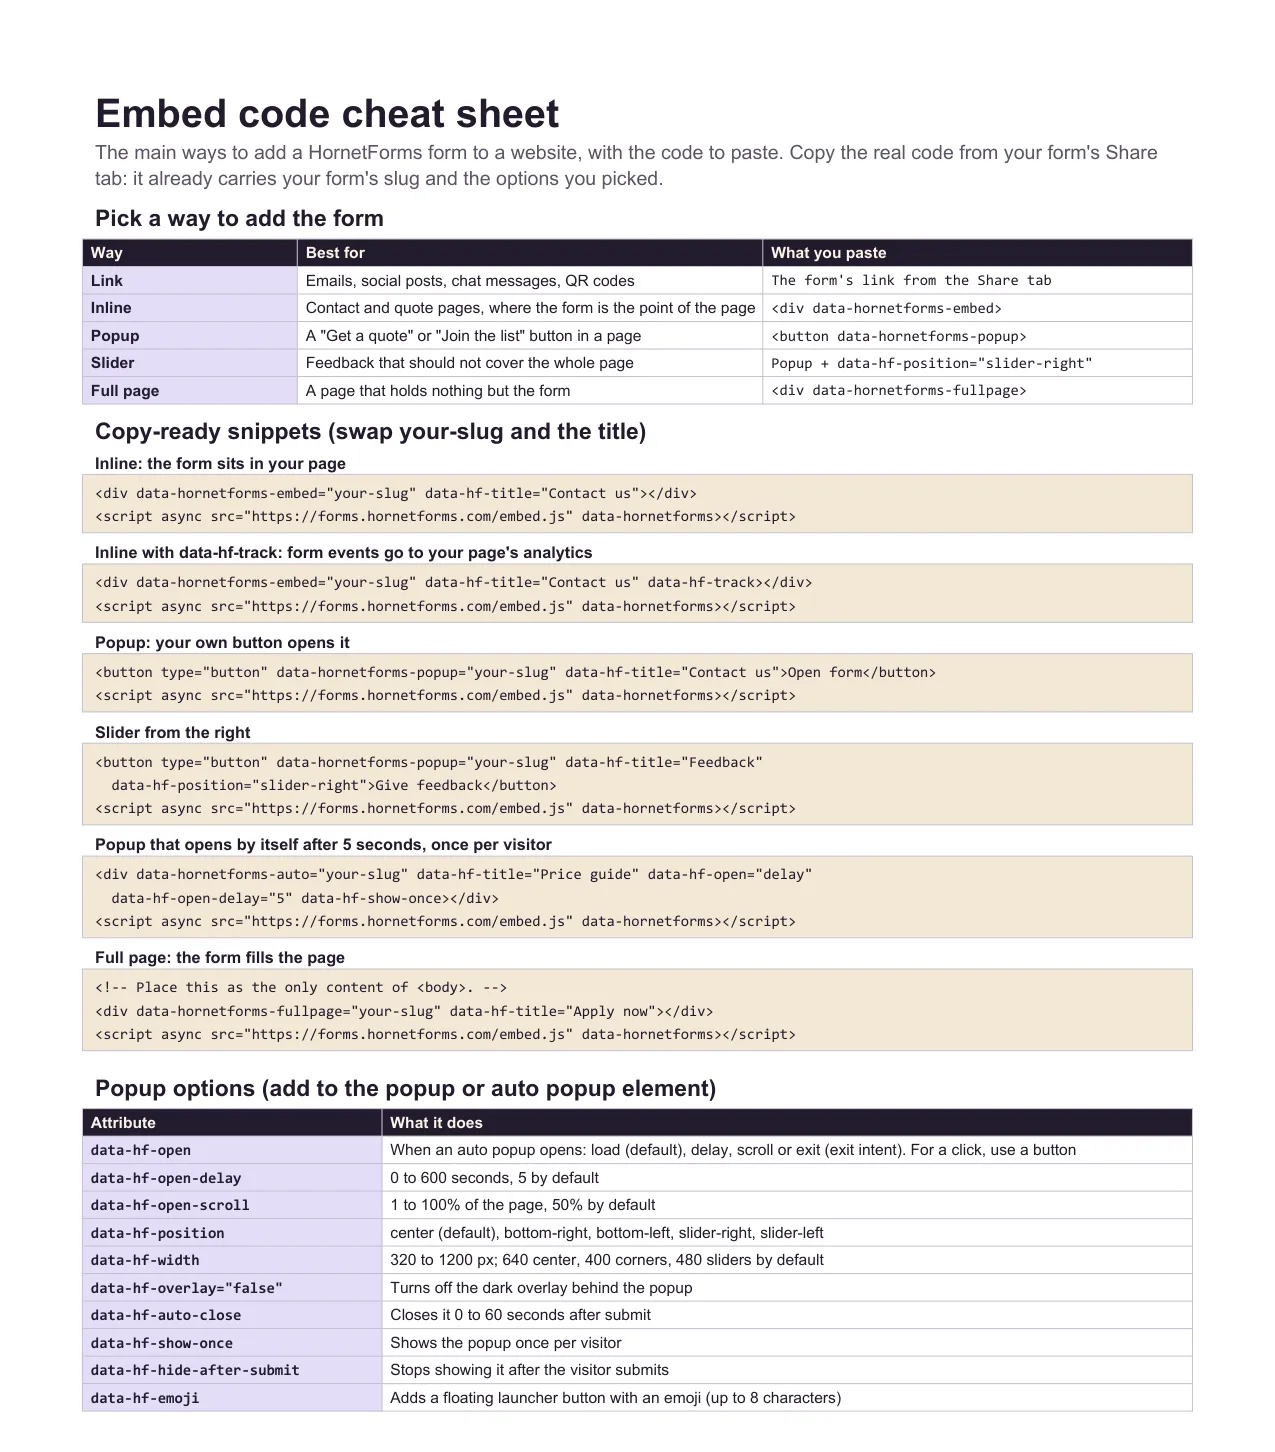
- Page one: the five ways to add the form, a copy-ready snippet for each embed mode, and every popup option with its range and default.
- Page two: where to paste the code, the embed script vs bare iframe table, the
data-hf-trackevent names, how embeds behave on phones, notes on UTM tags, pixels and payments, and a checklist for before you share the page.
Print it, or keep it open in a tab while you set up a client site.
Add your first form to your website today#
Pick one page, like your contact page, and decide: link, embed or popup. Copy the code from the Share tab, paste it into an HTML or embed block, and send a test response from your phone. If the form needs a starting point, our contact form template is ready to go, and the features page shows the rest. Printing posters too? The Share tab also makes a QR code for the form's link, as a PNG or SVG.
Sign up for free and add a form to your website this afternoon.