
On this page
You need a form on your site. A contact form, a sign-up box for launch news, a quick feedback form. So you search for an HTML form generator, click through a few, and end up with a wall of code you don't fully trust.
There are two honest ways to get a working form onto a web page. You can write the HTML yourself, which takes about 20 lines for a good contact form. Or you can use an HTML form generator that builds the form for you and hands you embed code to paste. This guide shows both. You get clean, accessible HTML you can copy and a plain answer to "where do the answers go?" You also get a free snippet pack with three starter forms and a one-page cheat sheet.
What an HTML form is#
The HTML standard puts it simply. "A form is a component of a web page that has form controls, such as text, buttons, checkboxes, range, or color picker controls. A user can interact with such a form, providing data that can then be sent to the server for further processing (e.g. returning the results of a search or calculation)." (WHATWG HTML Living Standard, section 4.10 Forms, accessed 28 October 2026)
Two parts of that sentence matter:
- Form controls. These are the boxes, buttons and lists people fill in. In HTML they are elements like
<input>,<select>and<textarea>. - Sent to the server. A form collects answers in the browser, then sends them somewhere. That "somewhere" is the part most guides skip. We'll get to it.
An HTML form generator is any tool that writes those form controls for you. Some give you raw HTML to paste into your page. Others give you a short embed code and run the form for you. They solve different problems, and the difference is the server.
A basic HTML form you can copy#
Here's a complete contact form. It uses only HTML, no JavaScript, and it follows the patterns the standard and the W3C recommend.
<form action="https://example.com/your-form-handler" method="post">
  <label for="name">Your name</label>
  <input id="name" name="name" type="text" autocomplete="name" required>

  <label for="email">Email address</label>
  <input id="email" name="email" type="email" autocomplete="email" required>

  <label for="message">Your message</label>
  <textarea id="message" name="message" rows="6" required></textarea>

  <fieldset>
    <legend>How should we reply?</legend>
    <input id="reply-email" name="reply_by" type="radio" value="email" checked>
    <label for="reply-email">By email</label>
    <input id="reply-phone" name="reply_by" type="radio" value="phone">
    <label for="reply-phone">By phone call</label>
  </fieldset>

  <button type="submit">Send message</button>
</form>
What each piece does:
actionandmethod.actionis the address that receives the answers.method="post"sends them in the body of the request, which is what you want for anything you store.name. Every answer arrives under its field's name. A field without anamesends nothing, which is a classic "why is my message blank?" bug.idandlabel for. The same text in both ties the label to its field.type. Picks the right control and the right checks.type="email"makes the browser check the format before it sends.required. The browser stops the send until the field has a value.autocomplete. Lets the browser fill in saved names and email addresses.fieldsetandlegend. Group the radio buttons and give the group its question.
Input types and when to use them#
Pick the type that matches the answer. A good HTML form generator does this for you, and by hand it's the cheapest upgrade any form can get.
| Type or element | Use it for | Tip |
|---|---|---|
text | Names, short answers | Add autocomplete="name" for full names |
email | Email addresses | The browser checks the format before it sends |
tel | Phone numbers | No format check, so accept spaces and plus signs |
url | Web addresses | Needs a full address, like https://example.com |
number | Counts and amounts | Set min, max and step |
date | Dates | Most browsers show a date picker |
checkbox | Yes or no, or "pick any" | Give every box in a group the same name |
radio | "Pick one" | Same name for the group, wrapped in a fieldset |
select | One choice from a long list | For a required list, make the first option value="" |
textarea | Long answers | Set maxlength |
file | Uploads | Needs method="post" and enctype="multipart/form-data" |
That tel tip comes straight from the standard: "Unlike the URL and Email types, the Telephone type does not enforce a particular syntax" (WHATWG HTML Living Standard, the input element, accessed 28 October 2026).
Accessible markup that works for everyone#
Good HTML form markup is mostly about labels and groups. The W3C's Web Accessibility Initiative (WAI) has a free forms tutorial, and its first rule is the one people break most: "Provide labels to identify all form controls, including text fields, checkboxes, radio buttons, and drop-down menus." (W3C WAI Forms Tutorial, Labeling Controls, accessed 28 October 2026)
The same page says how: "Whenever possible, use the label element to associate text with form elements explicitly. The for attribute of the label must exactly match the id of the form control."
Here's the short checklist we built into the starter forms:
- Label every field with a
<label>. The WAI tutorial is direct about the popular shortcut: "placeholder text is not a replacement for labels" (W3C WAI Forms Tutorial, Form Instructions, accessed 28 October 2026). Placeholder text vanishes as soon as someone types. - Group related choices. "The
<fieldset>element provides a container for related form controls, and the<legend>element acts as a heading to identify the group" (W3C WAI Forms Tutorial, Grouping Controls, accessed 28 October 2026). - Say "required" or "optional" in words. Put it in the label text, not only in a red star.
- Put instructions before the form. One line above the first field beats a tooltip nobody finds.
- Keep the focus outline. People who use a keyboard need to see where they are. Never remove it with
outline: noneand nothing in its place. - Ask only what you need. The WAI overview puts it plainly: "Only ask users to enter what is required to complete the transaction or process" (W3C WAI Forms Tutorial, accessed 28 October 2026).
Check any HTML form generator against this list before you paste its code. Plenty of generated forms still use placeholders as labels. For the full WCAG 2.2 list, see our accessible forms checklist.
Where the data goes: every HTML form needs a server#
This is the part that trips people up. The HTML you just copied only draws the form. When someone presses Send, the browser packs up the answers and sends them to the address in action. Something has to be waiting at that address.
The standard says as much and then steps aside: "The exact details for writing a server-side processor are out of scope for this specification." (WHATWG HTML Living Standard, section 4.10.1.2, accessed 28 October 2026)
So with hand-written HTML, you also need:
- A program on a server that accepts the request. That could be a small script on your own server or a serverless function.
- Checks on the server. Browser checks like
requiredhelp honest visitors, but they are easy to skip. The standard notes: "The server still has to verify the input is valid (since hostile users can easily bypass the form validation)". - A place for the answers. An email to you, a row in a database, a message in your team chat.
- Spam filtering (more on that below).
If you already run a server and like owning every line, that's a fine route, and the snippet pack gives you a clean start. If you don't, an HTML form generator that runs the form for you is usually the faster route. That's option two.
Option 2: an HTML form generator that gives you embed code#
The second way skips the server work. You build the form in a form builder, and it gives you a few lines of embed code to paste into your page. The builder receives and stores each response, so nothing has to be waiting at your end. Our guide on how to embed the form on your site covers each mode in more detail. To compare tools first, see how to pick an online form builder.
In HornetForms, that looks like this:
- Build the form. Use a template, start blank, or describe the form and let the AI draft it (the Free plan includes three AI generations a month). You get 20+ question types, logic that shows or skips questions, and up to 20 endings.
- Pick an embed mode in the Share tab: inline (inside your page), popup, slider or full page.
- Copy the code and paste it into any page that lets you add HTML or an embed block. Your site builder's help page shows where.
An inline embed is two lines. For a form with the address contact, it looks like this:
<div data-hornetforms-embed="contact" data-hf-title="Contact us"></div>
<script async src="https://forms.hornetforms.com/embed.js" data-hornetforms></script>
The embed script also forwards the page's utm_* parameters into the form, so each response records which campaign sent it. A bare iframe doesn't do that, so use the script. Our guide to capturing UTM parameters in forms covers the details.
Then decide where the answers should land. Responses show up in your dashboard, and you can export them as CSV on every plan. You can also send them to Google Sheets, Slack, Discord or Notion, or to your own code through webhooks. Email to yourself starts off, so turn on an email to yourself for each new response if you want one. Our post on where your form responses can go walks through each option.
People who fill in the form never need an account. And on every plan you get unlimited forms and unlimited responses within fair use.
Which HTML form generator route should you take? Here's the quick version.
| If you... | Pick |
|---|---|
| Already run a server and want full control of the markup | Hand-written HTML from the snippet pack |
| Want answers in Sheets, Slack or email without writing a backend | An embedded form |
| Need logic, file uploads or several pages | An embedded form |
| Are learning HTML and want to see how forms work | Hand-written HTML, then compare with an embed |
Not sure which form you need yet? Our website form examples post lists the six forms most sites need. For the full build process from a blank page, see how to create an online form.
Style it to match your site#
Hand-written HTML takes your own CSS. Each starter form ships with a short <style> block: one column, labels above fields, a clear focus outline and a big tap target for the button. Copy it into your stylesheet or swap in your own colours.
If you use an HTML form generator with embed code, the styling lives in the builder instead. An embedded HornetForms form has its own design settings. Every plan gets nine theme presets, 21 fonts and custom colours, plus a "One question at a time" layout. Pro and Business add your logo, a cover image and custom CSS, so you can match your site down to the border radius. See the pricing page for what each plan includes.
One tip either way: test the form on a phone before you ship it. Layout problems often hide on a wide laptop screen and only show up on a narrow one.
Stop spam with a honeypot and a time check#
Any form on a public page gets bot traffic sooner or later, whether you wrote it by hand or got it from an HTML form generator. You don't need a puzzle to stop most of it. Two quiet checks catch a lot:
- A honeypot. Add a text field that sits off screen, out of the tab order. People never see it, so they leave it empty. Many bots fill in every field. If the honeypot has a value, drop the response.
- A time check. Your server writes the time it sent the page into a hidden field. If the response comes back in under a few seconds, no human typed it.
All three starter forms in the pack include the honeypot markup and the hidden time field:
<div class="hp" aria-hidden="true">
  <label for="website">Leave this field empty</label>
  <input id="website" name="website" type="text" tabindex="-1" autocomplete="off">
</div>
<input type="hidden" name="started_at" value="">
The .hp class moves the field off screen. The checks themselves still run on your server, because only the server can decide to drop a response. Add a rate limit there too, so one address can't send hundreds of responses a minute.
With an embedded HornetForms form, these checks are built in on every plan: a honeypot, a time check and rate limits. Bots caught by the honeypot or the time check get a fake success message, so they learn nothing. Our post on spam protection that doesn't annoy humans explains how each layer works.
Download the HTML form snippet pack#
The HTML form snippet pack (ZIP) has three starter forms, each a full web page you can open in any browser:
- Contact form. Name, email, a topic list (sales, support, press, something else), message, how to reply, and an optional phone number.
- Sign-up form. Optional first name, email, interests, how they heard about you, and a consent tick box for launch news.
- Feedback form. A 1 to 5 rating, what worked, what to change, permission to follow up and an optional email.
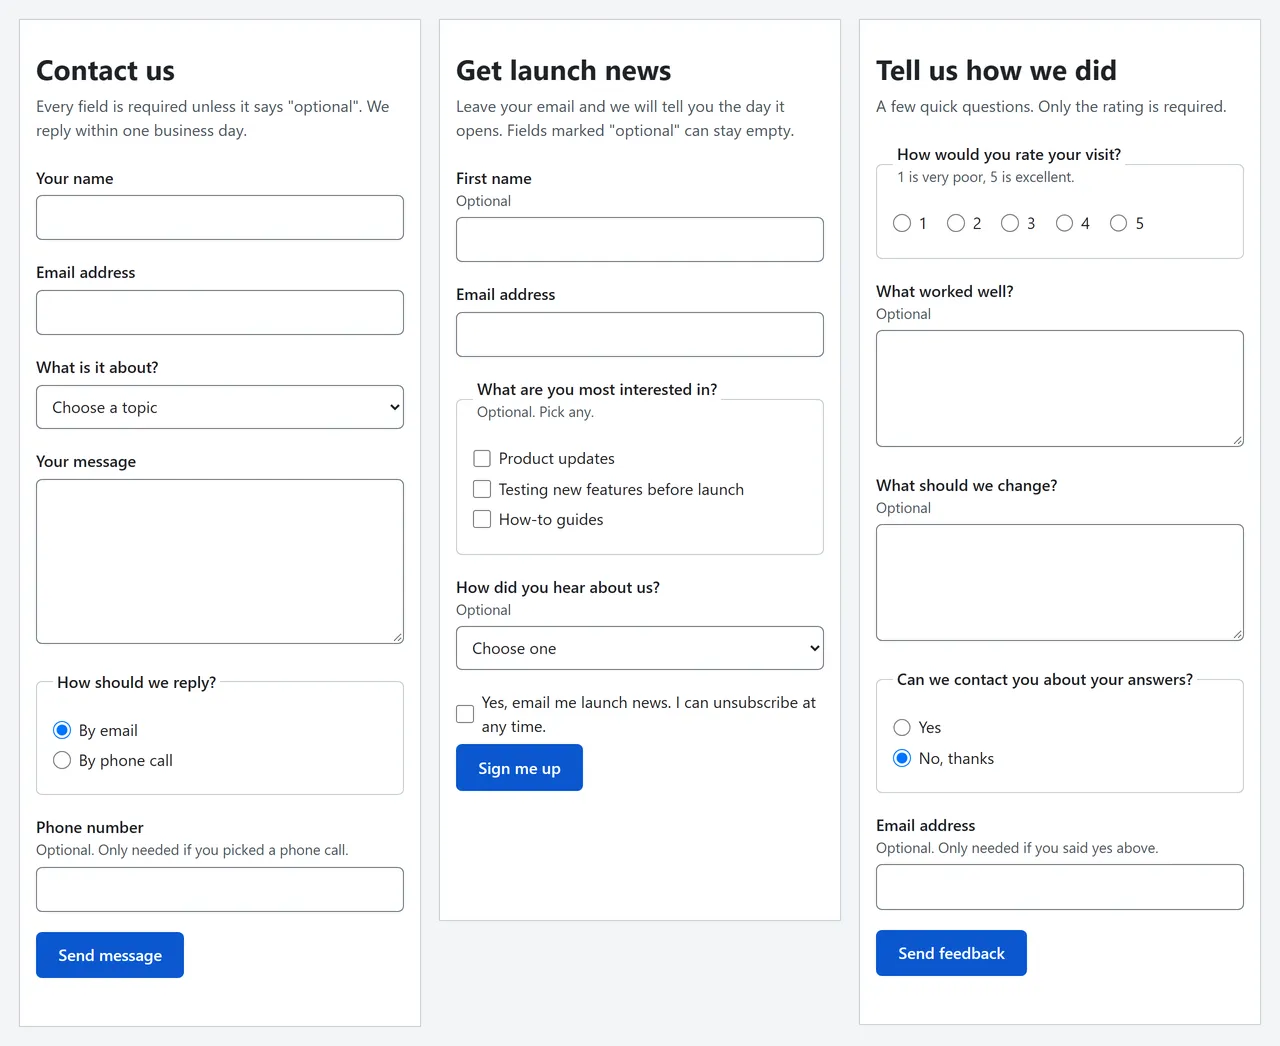
Every file passed the W3C Nu HTML Checker with no errors and no warnings. Each one labels every field, groups choices in a fieldset and needs no JavaScript. Comments at the top list what to change: the action address, the wording and the styles. It's the snippet half of an HTML form generator, minus the guesswork.
The HTML form cheat sheet (PDF, US Letter) puts the skeleton, the input types table, the attributes that matter, the accessibility checklist and the spam checks on one page. Keep it next to you when you check any HTML form generator's output. It also comes as an A4 PDF.
Prefer a ready-made version you can embed? Our contact form template asks for a topic, shows an order number box only for support messages and offers a call back.
Pick your route and ship the form#
If you have a server, grab the snippet pack, point action at your handler and add the honeypot and time checks there. If you'd rather skip the backend, use an HTML form generator that runs the form for you and gives you embed code. HornetForms is free forever on the Free plan, no credit card needed, and the features page shows the rest. Coming from Google Forms? Here's how HornetForms compares. Sign up for free and put your first embedded form on your site today.