
On this page
You have a form. Maybe it's a sign-up sheet, an intake form or a permission slip. Right now it lives in a Word file that people print, fill in with a pen and scan back to you. You'd like them to type into it instead. That's a fillable form, and there are three good ways to make one.
This guide shows how to make a fillable form in Word with content controls and what Google Docs can and can't do. Then it shows how to turn the same document into an online form that puts every answer in one table. You also get a free Word starter file with real fillable fields, plus a printable copy for people who prefer paper.
What "fillable" means: paper, document or online#
"Fillable" covers three different things. Before you decide how to make a fillable form, pick the kind that matches how you want the answers to come back.
| Kind of form | How people fill it in | How answers come back to you | Good for |
|---|---|---|---|
| Printable form | Pen on paper | A pile of sheets you type up later | Sign-in desks, people without a computer |
| Fillable document (Word or Google Docs) | Type into boxes, pick from lists, tick boxes | One file per person, by email or in a shared folder | A handful of forms, people who live in Word |
| Online form | Open a link on a phone or computer | Every response lands in one table | More than a few people, anything you want to count or sort |
A fillable document feels like the paper form, which people like. The catch shows up around form number 30: 30 files, 30 attachments, and someone has to copy every answer into a spreadsheet. Hold that thought for the online section.
How to make a fillable form in Word#
Word builds fillable forms with content controls: boxes for text, drop-down lists, date pickers and check boxes that sit inside an ordinary document. Microsoft's help page puts it simply: "In Word, you can create a form that others can fill out and save or print" (Microsoft Support, Create a form in Word that users can complete or print, accessed 28 October 2026).
You need the desktop app for this part. The same page says: "Creating fillable forms isn't available in Word for the web." Here's how to make a fillable form in Word for Windows, step by step.
Step 1: show the Developer tab#
The content controls live on the Developer tab, and Word hides it at first. Microsoft says: "The Developer tab isn't displayed by default, but you can add it to the ribbon" (Microsoft Support, Show the Developer tab, accessed 28 October 2026). Go to File > Options > Customize Ribbon, and under Main Tabs select the Developer check box. It stays there from then on.
Step 2: write the form as plain text#
Type the title, one line on who should fill it in and when to send it back, and each question, just as you would on paper. A two-column table helps: the question on the left, the answer box on the right. It keeps everything lined up when people type long answers.
Write a clear label for every box. W3C's forms tutorial says: "Provide labels to identify all form controls, including text fields, checkboxes, radio buttons, and drop-down menus" (W3C Web Accessibility Initiative, Labeling Controls, accessed 28 October 2026). W3C wrote that for web forms, and it holds for a Word form too. "Email address" beside a box beats a box on its own.
Step 3: add a content control for each answer#
Click where the answer goes, then pick a control from the Controls group on the Developer tab. Four controls cover almost every form:
| Control on the Developer tab | Use it for | Example |
|---|---|---|
| Plain Text Content Control | Names, email addresses, short answers | Full name |
| Drop-Down List Content Control | One answer from a list you set | Which session would you like? |
| Date Picker Content Control | Dates, picked from a calendar | When would you like to start? |
| Check Box Content Control | Yes or no, or "tick all that apply" | Which days can you come? |
Word also has a rich text control. Microsoft explains the difference: the rich text control "enables users to format text (e.g., bold, italic) and type multiple paragraphs. To limit these capabilities, use the plain text content control." For a form, plain text is usually the one you want.
There's a similar choice for lists. The same page says: "In a combo box, users can select from a list of choices that you provide or they can type in their own information. In a drop-down list, users can only select from the list of choices." Use a drop-down list when you need answers you can count later.
Step 4: set the choices and the date format#
Select a control and go to Developer > Properties. For a drop-down list, select Add and type each choice in Display Name. For a date picker, choose how the date shows, such as "March 29, 2027". One trap from Microsoft's page: "If you select the Contents cannot be edited check box, users won't be able to click a choice." Leave that box clear.
Step 5: protect the form, then test it#
Without protection, people can change your questions as easily as their answers. Microsoft's advice: "If you want to limit how much others can edit or format a form, use the Restrict Editing command." Go to Developer > Restrict Editing, choose your restrictions, then select Yes, Start Enforcing Protection.
Then fill in the form yourself, the way a stranger would. Tab through it, pick a date, tick a box and save a copy. If anything feels fiddly to you, it will feel worse to someone in a hurry.
That's how to make a fillable form in Word. If you'd rather skip the setup, the starter file at the end of this guide already has all four kinds of control in place.
How to make a fillable form in Google Docs#
Google Docs has no Developer tab and no content controls. It does have a few pieces that get you close:
- Dropdowns. Google's help says you can "Type “@dropdown” and press Enter" or "Open the Insert menu and select Dropdown" (Google Docs Editors Help, Use Google Docs with a screen reader, accessed 28 October 2026). You can rename a new dropdown and edit its options before you save it.
- Date chips. Type
@datewhere the date goes (Google Docs Editors Help, Insert smart chips in Google Docs, accessed 28 October 2026). - Placeholder chips. The same page explains that "to add a smart chip that a collaborator can fill in", you select Placeholder chip. You then choose what kind of information they should add.
- Checklists. The screen reader help page says: "To start or change to a checklist, press Ctrl + Shift + 9 (Command + Shift + 9 on Mac)."
- Text answers. Use a two-column table: the question on the left, an empty cell on the right.
The limit is that a Google Doc stays one shared document. Anyone who fills it in is editing that document. So either you make a copy for each person, or everyone types into the same file and sees each other's answers. Either way, the answers don't gather into a table for you.
So when you're working out how to make a fillable form in Google Docs, ask how many people will fill it in. For a team checklist or a form for five people, a Doc is fine. For a class, a club or a waiting list, an online form saves you hours. Google's own tool for that is Google Forms, a separate app from Docs (here's how HornetForms compares with Google Forms).
Turn your fillable form into an online form#
Here's the bigger change, and for most groups it's the best answer to how to make a fillable form. Instead of a file that goes back and forth, people open a link, and every answer lands in one place. You don't have to retype your Word form to get there.
In HornetForms, open the Import page and upload a PDF or Word (.docx) file. The AI reads it and rebuilds it as an online form for you to review. If your Word form is an older .doc file, save it as .docx first. Each file uses one AI generation and can be up to 10 MB. The Free plan includes three AI generations a month, Pro includes 30 and Business 100.
Then check the draft the way you tested your Word form. Your content controls map onto online question types like this:
| In your Word form | In the online form |
|---|---|
| Plain text box (name, phone) | Short text, or an email or phone question |
| Plain text box with line breaks | Long text |
| Drop-down list | Dropdown, or multiple choice if there are only a few options |
| Date picker | Date |
| Check boxes | Checkboxes |
| "Type your name to sign" | Signature |
That's six of the 20+ question types, and they all work on every plan. An online form can also do things a document can't. Logic can show a question only when it applies: the email question appears only after someone ticks "Can we email you?". Respondents never need an account, and you share the form as a link or a QR code. If your questions already sit in a spreadsheet, the CSV import is free and reads the file in your browser.
For the whole process, from picking questions to sharing the link, see how to create an online form. Or skip the blank page and start from the workshop registration form template.
Fillable forms that email you#
A Word file can't send itself back. Someone has to save it, attach it and remember to hit send. An online form takes that step away, and it can email you too:
- An email for each response. You can turn on an email to yourself for each new response in the form's notification settings. It starts off, so switch it on once.
- A PDF copy in that email. On Pro and Business, the email can carry a PDF copy of the response.
- A confirmation for the person who filled it in. Write your own subject and message, then pick which email question holds their address. With no email question picked, nothing goes out.
- The answers in your own tools. Responses can flow into Google Sheets, Slack, Discord or Notion on every plan. CSV export works on every plan, and Excel export comes with Pro and Business. There's a tour of where your form responses can go.
HornetForms gives you unlimited responses within fair use, so a sign-up form that takes off doesn't stop at a cap. If you've hit one elsewhere, here's what happens when a form hits its response limit.
Printable versions of a fillable form#
Some people will always want paper, so keep a printable copy around.
- Print the Word form. Microsoft notes: "You can print a form that was created via content controls. However, the boxes around the content controls will not print." Add writing lines or table borders if people need space to write by hand.
- Use our printable PDF. The starter download includes the same form with writing lines and tick boxes, in US Letter and A4.
- Print online answers too. You can download any response as a PDF on every plan. That's handy when someone asks for a copy of what they sent, or when you keep a paper file.
When paper copies come back, type them into the online form yourself. Then every answer sits in the same table, whatever way it arrived. Our student information sheet works this way: an online form for most families, with a PDF and a Word copy for the rest. Got a whole stack of paper forms to move? See how to convert paper forms to digital.
Download the free fillable form starter files#
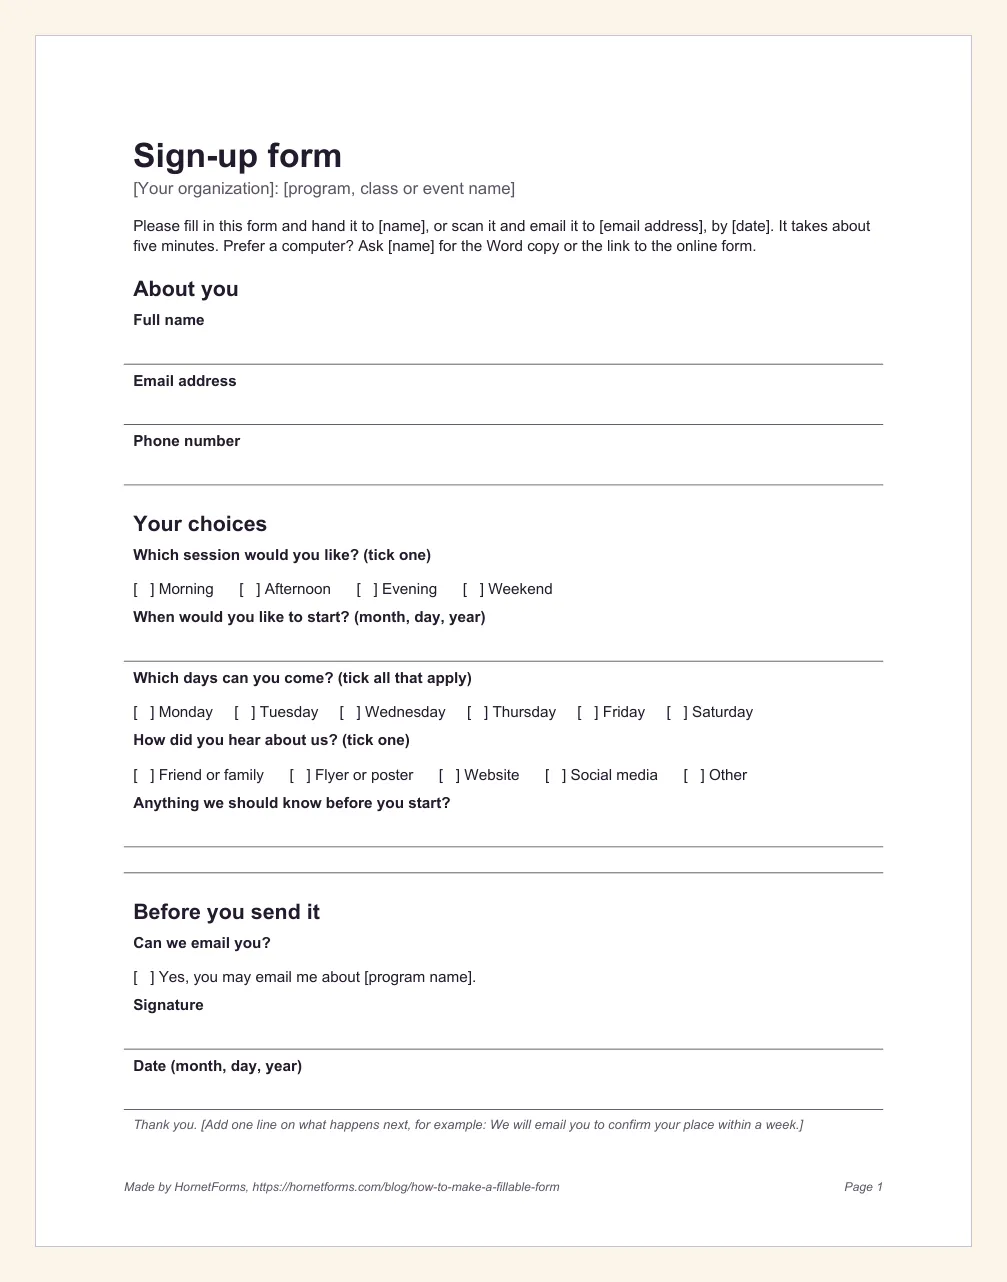
The fillable form starter (Word, DOCX) is a one-page sign-up form with 16 real Word content controls:
- four plain text boxes (full name, email address, phone number, and a typed name to sign)
- one text box that takes line breaks ("Anything we should know before you start?")
- two drop-down lists (the session, and how they heard about you)
- two date pickers (a start date and the date signed)
- seven check boxes (six days of the week, plus "Can we email you?")
It's the quickest way to see how to make a fillable form without building one from scratch. Swap everything in square brackets for your own details. Page two lists every box and walks through editing it in Word, so delete that page before you send the form. The same sign-up form comes as a printable PDF in US Letter and in A4.
Need help with the questions themselves? The questionnaire template post has 12 you can copy, with the answer type for each one.
Make your next fillable form online#
Built your Word version already? Good: it's not wasted. Upload it as a .docx or PDF file, let the AI rebuild it, check the question types and share the link. HornetForms is free forever on the Free plan, with no credit card needed to sign up, and the pricing page lists what Pro and Business add. Sign up for free and turn your next fillable form into one table of answers.