
On this page
Somewhere in your office there's a stack of clipboards. New clients fill in the same form every week, someone types the answers into a spreadsheet on Friday, and nobody can read the handwriting on the phone number. You've decided it's time to convert paper forms to digital ones.
You don't need a big project. You need a list of what's on the paper, a decision about each box, and an afternoon to build and test. This guide walks through how to convert paper forms to digital forms in seven steps, from the audit to the first real response. You'll also get a free conversion worksheet and a one-page checklist to print.
It works for any front desk: a salon, a nonprofit's volunteer table, an HR onboarding pack or a school office.
Why convert paper forms to digital at all#
Answers arrive typed, in one table, the moment someone presses Submit. Nobody retypes them or squints at a smudged email address.
But the bigger win is the chance to fix the form itself. The UK government's service manual says it plainly: "Paper forms and digital forms have different strengths and weaknesses. Design for both formats with the same amount of care and attention." It adds: "The move from paper to digital is an opportunity to transform how your service is delivered, rather than simply putting paper forms online." (GOV.UK Service Manual, Structuring forms, read 2 November 2026.)
US federal agencies have noticed the same thing. Digital.gov's guide to the Paperwork Reduction Act, written for those agencies, says paper forms "can benefit from a conversion to an interactive form, like a web-based form or an editable PDF." It also warns that "many agencies find that a form conversion will spark other, more substantive changes in what information is collected and how questions are written." (Digital.gov, Do I need clearance?, read 2 November 2026.) The lesson holds for any front desk: expect to rethink a few questions.
Before you start: audit the paper form#
The first job when you convert paper forms to digital is an audit. Lay the paper form flat and go box by box. For each one, write down three things: what the box asks, whether you keep it, and why you need the answer.
Most boxes fall into one of three groups:
- Keep. You need the answer to do the job: a name, a phone number, the pet's breed.
- Drop. Nobody reads it, or the online form records it for you. "Today's date" and "Date signed" are the classic ones, because every online response records when it arrived.
- Office use. The "For office use only" strip at the bottom. Staff fill it in, not the client, so it moves to your own sheet.
Watch for boxes that ask two things at once. "Breed and age" on paper is one line, but online it works better as two questions: a short text for the breed and a number for the age. GOV.UK's guidance on questions agrees: "A series of simple questions can be easier to answer than one complex question." (GOV.UK Service Manual, Designing good questions, read 2 November 2026.)
The free conversion worksheet (below) turns the audit into your build plan.
Build it in HornetForms: the short version#
Here's how to convert paper forms to digital in HornetForms, on any plan, including Free. Each step gets its own section below.
- Get the questions in. Retype them, import a CSV file of your questions for free, or let the AI rebuild the form from the original PDF or Word (.docx) file.
- Check each question type against your worksheet, and switch on Required only for the must-have answers. Questions start optional.
- Add show rules so people skip the questions that don't apply to them.
- Add a signature question and a file upload if the paper form had a signature line or asked for copies of documents.
- Test it in the preview, in the desktop and mobile views. Preview answers aren't saved.
- Share the link or a QR code, and keep a device at the front desk for walk-ins.
- Send the answers somewhere useful: Google Sheets, a CSV export or a PDF of each response.
Respondents never need an account or a sign-in to fill in the form or upload a file.
Step 1: get the questions off the paper#
Pick the way in that matches what you already have.
You have the original file. Many paper forms started life as a printed Word document or PDF. If you can find that file, import it: HornetForms' AI reads a PDF or Word (.docx) file and rebuilds it as an online form for you to review. Each file uses one AI generation and can be up to 10 MB. The Free plan includes three AI generations a month, Pro 30 and Business 100. An older .doc file needs saving as .docx first.
You've been typing paper answers into a spreadsheet. Export the sheet as CSV and use the free CSV import, which reads the file in your browser. Each column becomes a question (up to 50 columns), 10 questions to a page, and HornetForms guesses each question's type from your example rows. The example rows never become responses. The import brings questions only, so you add logic, required questions and endings in the editor afterwards.
You only have the printed copy. Retype it. For a one-page form this takes about as long as making coffee. Type / in the editor to add each question.
Good to know: however the questions get in, compare the result with your worksheet row by row. An import is a fast first draft, not a finished form.
Step 2: match each box to a question type#
Paper has lines to write on and boxes to tick. Online you get 20+ question types, and the right one does much of the tidying for you.
| On the paper form | Use online |
|---|---|
| A line for a name or a short answer | Short text |
| A big empty box ("Tell us about...") | Long text |
| Email or phone line | Email or Phone, which check the format |
| Age, number of guests, quantity | Number, with optional Min, Max and "Whole numbers only" |
| Tick one of these | Multiple choice, or Dropdown for a long list |
| Tick all that apply | Checkboxes |
| Date line | Date |
| Signature line | Signature |
| "Please attach a copy of..." | File upload |
If a box doesn't fit the table, see every question type and when to use it. Then switch on Required only for the answers you can't work without.
Step 3: hide the questions that don't apply#
Paper forms are full of instructions like "If yes, go to question 12" and "Home visits only." Online, conditional logic does that job for you. A question with a show rule stays hidden until its rule matches, so people who don't need it never see it.
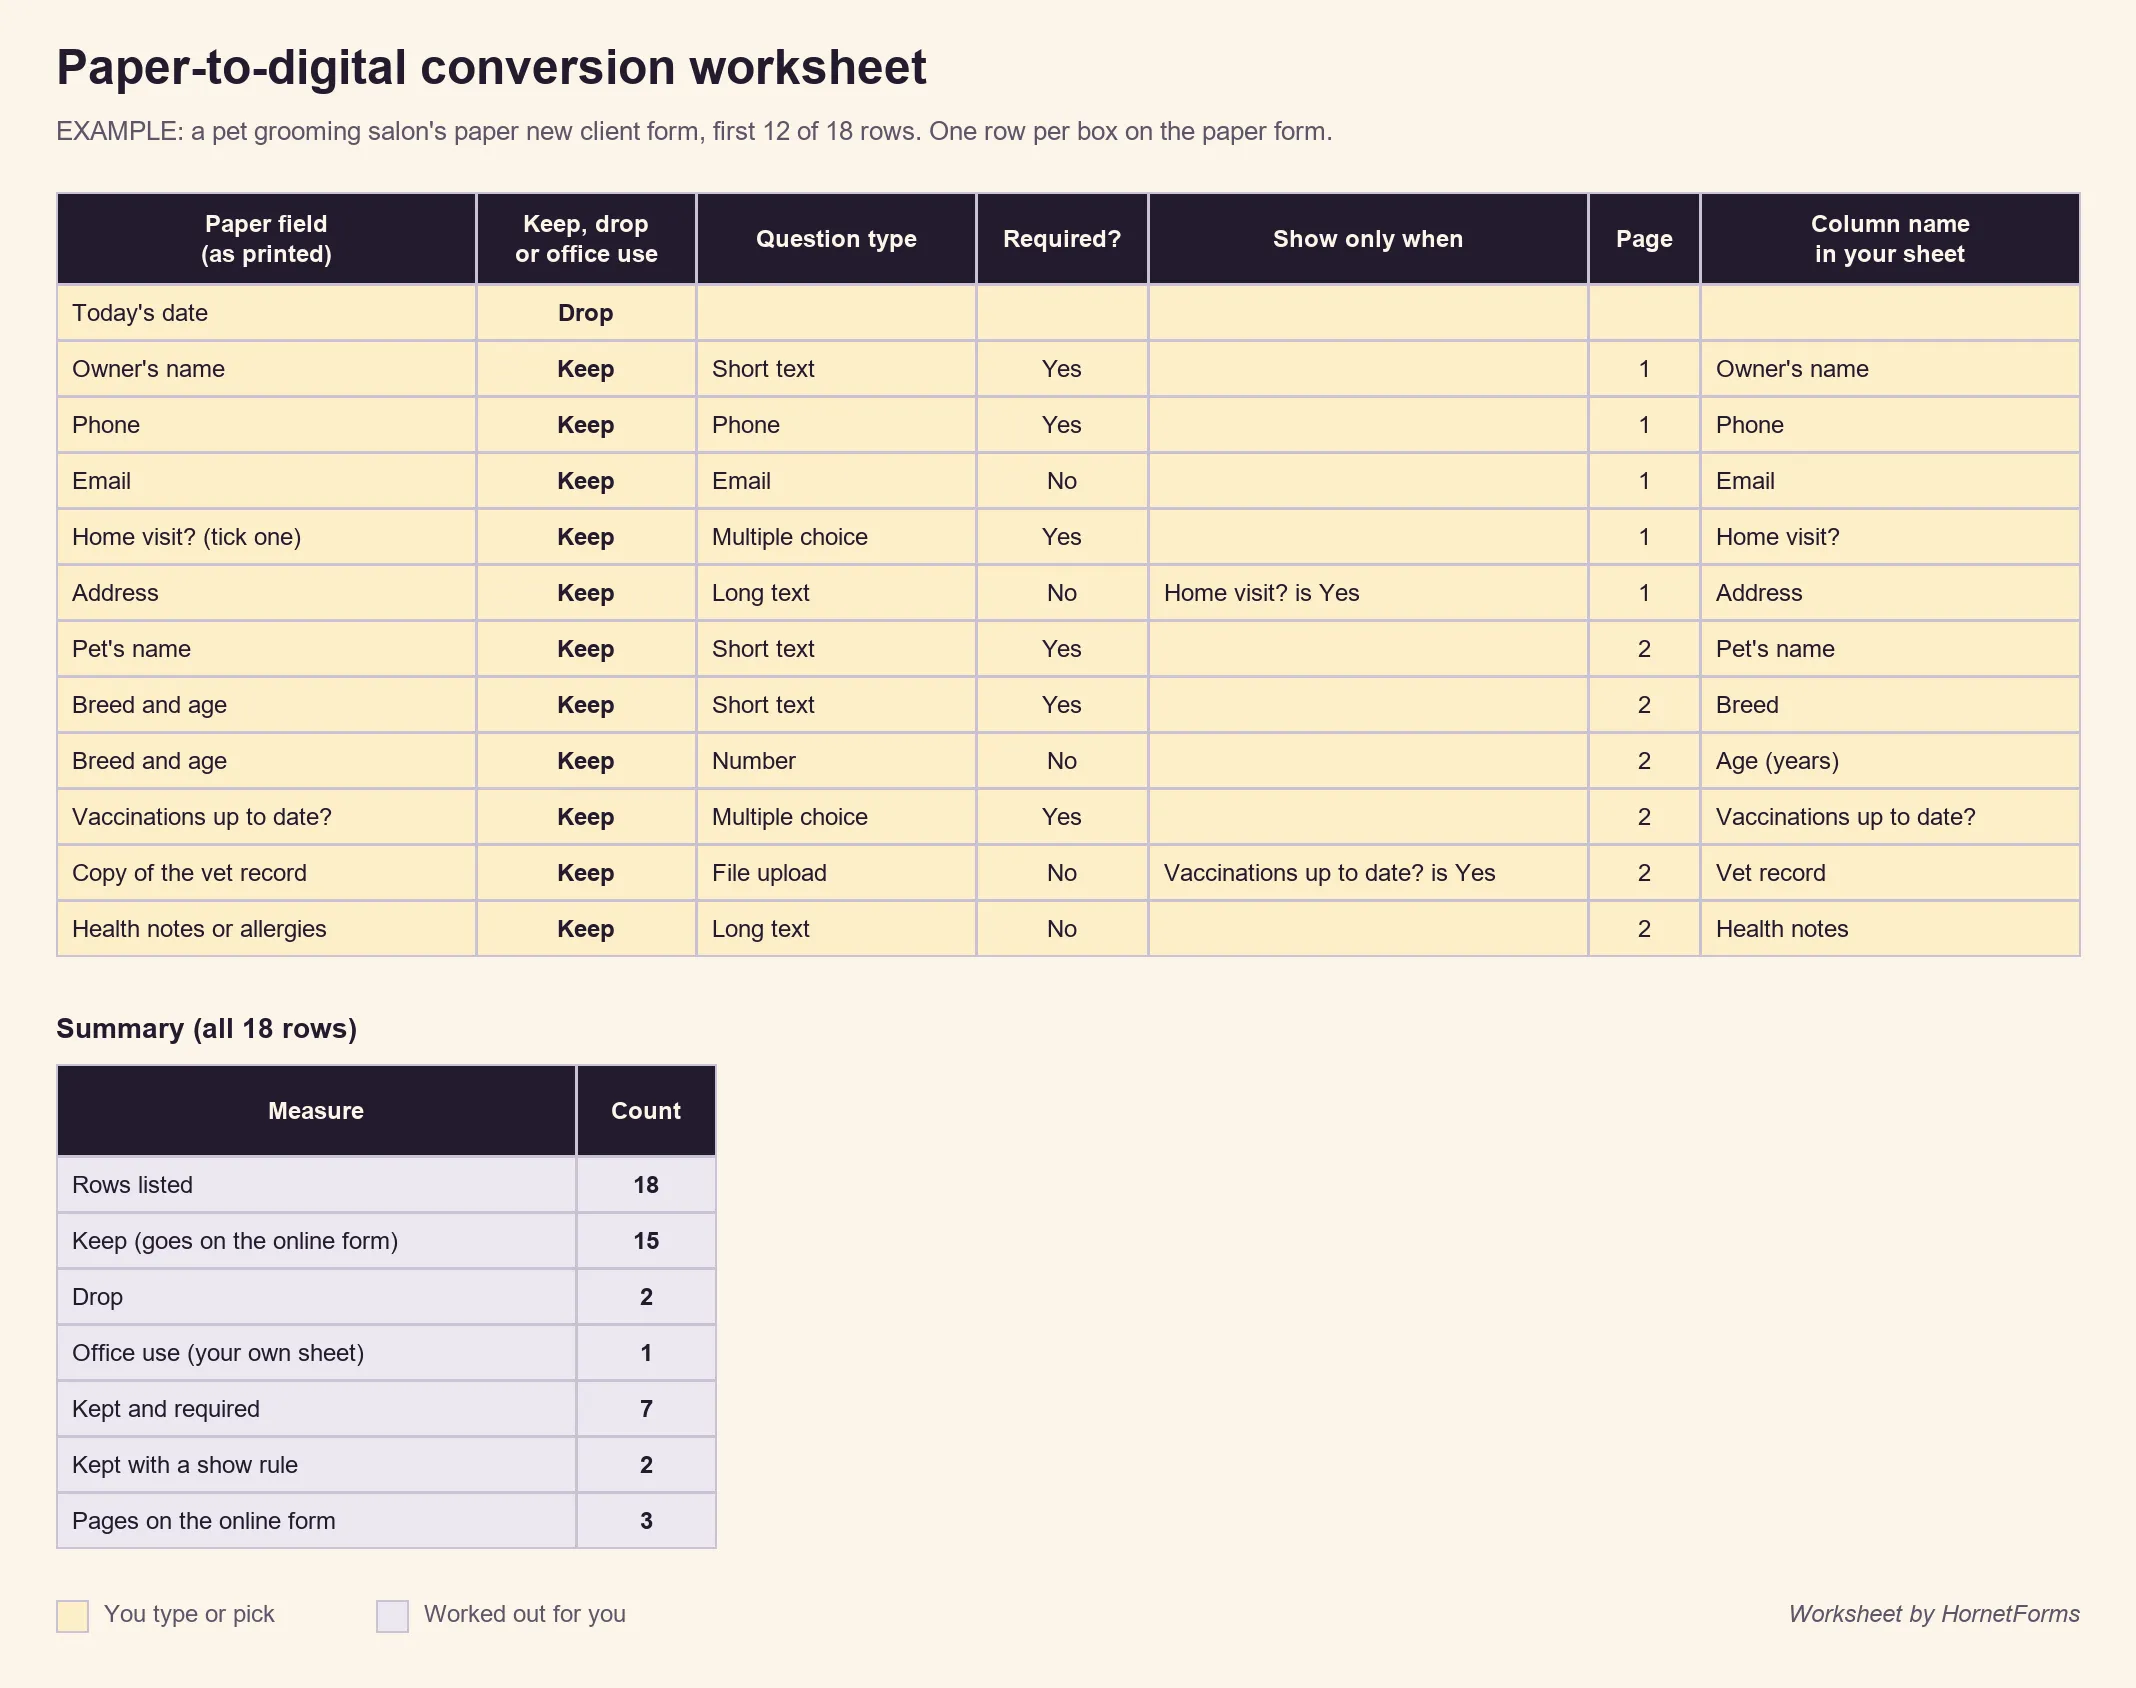
In the worksheet example, the address only appears when someone picks Yes for a home visit, and the vet record upload only when the vaccinations are up to date.
Long paper forms also break into pages. Use "New page" in the / menu to split the online form into short steps, and the progress bar shows people how far they've come.
Step 4: signatures, files and instructions#
Three paper habits need a little thought online.
- Signatures. Add a signature question where the paper had a signature line. Put the terms people agree to in a short note just above it. If your form has legal weight in your field, check your own rules on what counts as a signature.
- Copies of documents. Swap "please attach" for a file upload question. It takes up to 10 files, you can limit the allowed file types, and Free allows files up to 10 MB each (Pro and Business have no plan cap).
- Instructions. Cut the dense paragraph of rules at the top, and move each instruction next to the question it explains.
If some people will fill in the form with a screen reader or a keyboard, accessible forms covers labels, errors and contrast.
Step 5: test it before you share it#
Fill in the form yourself in the preview, in both the desktop and mobile views. Preview answers aren't saved, so test as often as you like. Then hand your phone to someone who has never seen the form and watch them fill it in. Don't help. Every place they pause is a question to reword.
Last, send one real test response and check that every answer sits in the column you planned.
Step 6: put the form where people already are#
Most front desks use all three of these:
- The link. Put it in booking emails, texts and on your website.
- A QR code. The Share tab gives you a QR code as a PNG or SVG file. Print it on a card at the counter, on the door or on your flyers. Here's how to make a QR code for a form people actually use.
- A tablet at the front desk. Open the form link on a tablet for walk-ins. After each person submits, reload the link and the next person gets a fresh, empty form.
Step 7: decide where the answers go#
Online answers should land where you already work:
- Google Sheets. A new spreadsheet starts with a Response ID column, a Submitted at column (the time the response came in), one column per question and a link to the response.
- CSV export. Download every response as a CSV file on any plan.
- A PDF of any response. Handy for a client file or a copy someone asks for.
- An email to yourself. Notifications start off, but you can turn on an email to yourself for each new response.
Slack, Discord and Notion connect on every plan too: see where your form responses can go.
On Pro and Business you can add your front desk team to the workspace. Anyone you add can read every response in it, so set up the workspace with that in mind.
Keep a paper backup during the switch#
Most teams that convert paper forms to digital keep paper going for a while, and that's fine. Print a few copies of the new version for people who ask.
When a paper copy comes back, type it into the online form yourself the same day. Every answer then sits in one table, whatever way it arrived. Decide too what happens to the paper copies once you've typed them in, following your own record rules.
If you'd rather keep a fillable document instead of an online form, how to make a fillable form covers Word and Google Docs. And for building an online form from scratch, rather than from paper, see how to create an online form.
Download the conversion worksheet and checklist#
The conversion worksheet. To plan how you convert paper forms to digital box by box, the paper-to-digital worksheet (Excel) opens in Excel and Google Sheets. It has one row per paper box: the field as printed, your decision, why you need it, question type, required, show rule, page and column name. Dropdowns cover the decision, the question type and Required. A Summary tab counts what you kept, dropped and moved, the number of pages, and flags kept rows that still need a question type or a column name. It starts with 18 EXAMPLE rows from a pet grooming salon's new client form, so delete those first. The worksheet as a CSV holds the same columns and example rows for any other tool.
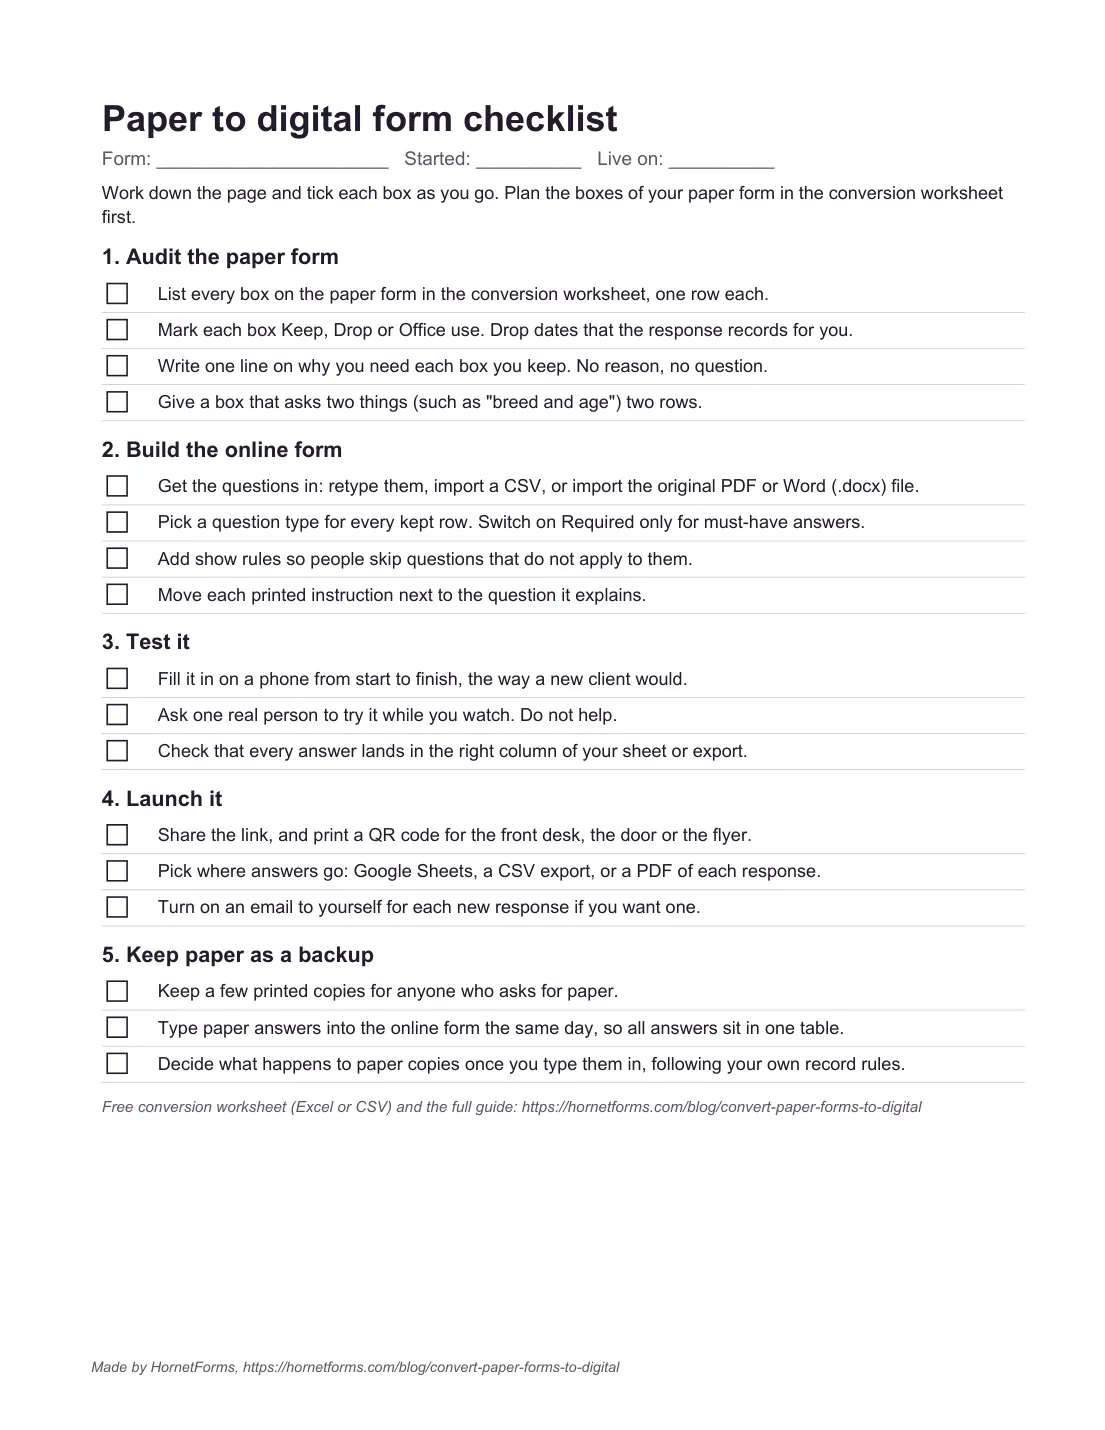
The one-page checklist. Print the checklist, US Letter or A4. It has 17 tick boxes in five stages: audit, build, test, launch and keep paper as a backup.
Convert your first paper form this week#
The best place to start is the paper form you retype most often. Fill in the worksheet, build it, test it on one person, and put the QR code on the counter. The Free plan is free forever, with unlimited responses within fair use and no credit card needed to sign up, and the pricing page shows what Pro and Business add.
Sign up for free and convert paper forms to digital, starting with one, before the next clipboard goes out.