
On this page
Most small events run on three tools. A form collects names, a payment link collects the money, and a spreadsheet tries to match the two. Then someone pays twice, someone registers but never pays, and the guest list and the bank account tell different stories.
An event registration form with payment puts both in one step. People fill in their details, pay on the next screen, and land on your list only once the money has gone through. This guide covers the questions to ask and how to set the price from the answers. It also shows how to stop at capacity and on your deadline, and how to keep one clean list. At the end you'll find a free template, printable copies and a registration tracker.
What to ask on an event registration form with payment#
Ask only what you'll use before or on the day. Every extra question is one more reason to close the tab before the payment screen. Here's the set in our template, across two short pages:
| Question | Type | Why it's there |
|---|---|---|
| Full name | Short text, required | For the list on the day |
| Email, required | Where the event details go, and the answer that stops double sign-ups | |
| Phone | Phone, optional | Only for last-minute changes on the day |
| Company or organization | Short text, optional | Handy for name badges and for knowing who's in the room |
| Registration type | Multiple choice, required | Sets the price: Standard, Student or concession, Supporter |
| Are you bringing a guest? | Multiple choice, required | Adds the guest to the price and to your headcount |
| Guest's full name | Short text, shown for "Yes, one guest" | So the guest is on the list too |
| Dietary needs | Checkboxes | Counts for the caterers, for the person and their guest |
| What should the caterers know? | Short text, shown for "Something else" | Allergies and anything the checkboxes miss |
| Accessibility needs | Long text, optional | Step-free access, captions, a reserved seat, a quiet room |
| Can we email you about future events? | Multiple choice | A clear yes or no for your mailing list |
The template also carries a hidden source field, so a link like ?source=newsletter tells you which channel brought each registration. People never see it. Not sure which question type fits your own extras? Here's which question type to pick.
Good to know: each page of the template has a short "why we ask" line. People answer more freely when they can see why you want something, especially phone numbers and access needs.
Why a small fee changes who turns up#
Free events lose a lot of people between sign-up and the door. One organiser of a monthly web engineering group in Düsseldorf put it plainly on Hacker News: "Indeed, our no-show rate is something between 40% and 50%. This is heavy, but we know it and calculate it in." (Hacker News, 14 October 2019).
Wider data points the same way. PheedLoop, a company that sells event software, looked at attendance data from more than 1,070 events run on its platform. It found a median no-show rate of about 28% for free events (389 events) and about 17% for paid events (683 events) (PheedLoop Event Data Lab Report #05, 29 April 2026). That's one vendor's own data, and it counts people who cancelled in advance as no-shows, so treat it as a rough guide.
A fee won't fill every seat, and plenty of great events stay free. But if empty chairs cost you food and room hire, a small charge or deposit is worth a test. Running a fundraiser instead? A pledge form template collects promises to give rather than a fixed fee. The rest of this guide shows how to build an event registration form with payment that takes it in the same step.
Take the fee in the same form#
In HornetForms, a Payment block turns any form into an event registration form with payment, on every plan, Free included. It takes a one-time payment on Stripe's hosted Checkout page, right after someone answers your questions. It works for fairs too, where you can take booth fees in the form when vendors apply. Taking cash or bank transfers from a group instead? See how to collect money for an event.
Connect your own Stripe account#
A workspace admin connects a Stripe account once, under Settings, then Payments. The money goes straight to your Stripe account, and you are the merchant of record. HornetForms never sees or stores card data, because people pay on Stripe's own page.
Set the price from the registration type#
The template already works out the price. A calculated field called price sits on page two, where people never see it, and logic rules fill it in from the answers:
Registration type is "Standard"                    → price = 40
Registration type is "Student or concession"       → price = 20
Registration type is "Supporter"                   → price = 60
Are you bringing a guest? is "Yes, one guest"      → price = price + 30
So a student who brings a guest pays 50. These are sample prices, so swap in your own before you publish. The rules run in order, which is why the guest rule comes last. Our logic, piping and calculations guide walks through rules like these.
The last step is yours: add the Payment block, so the money lands in your own Stripe account. It takes about a minute:
- Open your copy of the template and add a Payment block at the end of page two.
- Set the price to come from the calculated field
price, instead of a fixed amount. - Pick your currency.
Want a free option too, say for speakers or volunteers? Add a registration type and a rule that sets its price to 0. When the price comes out at 0, the form completes normally, with no payment step. If the whole event is free, an online RSVP is the simpler route.
What people see when they pay#
After the last question, people go to Stripe's Checkout page to pay. Until they finish, their registration waits in an Awaiting payment tab, away from your main list. Emails, webhooks and integrations fire only after the payment goes through, so nobody gets a "you're registered" email for a place they never paid for.
If someone needs a refund, handle it in your own Stripe Dashboard. HornetForms shows the refund status on the response, so your list stays honest. The form also works embedded on your event page: with the HornetForms embed script, the whole page goes to Stripe for the payment step.
Stop at capacity and on your deadline#
A venue has a fire limit and a caterer needs a final number. Your event registration form with payment should know both.
Set a response limit that leaves room for guests#
The response limit closes the form when it reaches your number, on every plan. While someone is on the payment page, the form holds their place, so people paying at the same moment can't push you past your limit.
One catch: the limit counts registrations, not people. A registration with a guest is two people but one response. So set the limit lower than your seat count when you allow guests:
- Never over, even if everyone brings a guest: halve your seats. For 60 seats, cap at 30 registrations.
- A realistic cap: if about one in three people bring someone, 45 registrations come to about 60 people.
The tracker below counts people with guests included, so you can watch the real number and lower the limit as you go.
One registration per email#
Turn on one response per person and pick the Email question. The form then turns away a second registration with the same email address. People never need an account or a sign-in to register.
Open and close on time#
Set a scheduled opening date and the form opens at a set date and time, with a notice for early visitors until then. Set a close date for your deadline. When the form closes or fills up, visitors see your own closed message, so write one that helps: "We're full. Follow us for the next date."
If you're weighing up Google Forms#
Here's where Google Forms stands for an event registration form with payment, as of October 2026. It can now close itself at a date and time or after a set number of responses, on every account type, including personal ones (Google Workspace Updates, 12 January 2026). But the question types Google's help pages describe (Google Docs Editors Help, question types, accessed 27 October 2026) don't include a payment question, so the fee needs a separate link that you match up by hand. Its "Limit to 1 response" setting also makes everyone sign in to a Google Account (Google Docs Editors Help, sharing your form, accessed 27 October 2026). Our guide to a Google Form with payment covers the ways around that. Our Google Forms comparison and the post on where Google Forms starts to pinch go further.
Get the free event registration form template#
Our paid event registration template gives you an event registration form with payment in two short pages. It has the questions above, the guest and dietary follow-ups, the hidden source field and the calculated price with its four rules. The thank-you screen says "You're registered".
- Open it in HornetForms. The template page at
forms.hornetforms.com/templates/paid-event-registrationhas a Use this template button. It takes you through sign-up and opens your own copy. Then add the Payment block as described above. - Print it. For phone bookings or a registration desk, download the PDF, US Letter, the PDF, A4 or the Word (DOCX) version if you want to add your logo.
Planning something bigger or more hands-on? The conference registration form adds pass types and badge details, and the workshop registration form lets people pick one session from a list.
Charging yearly dues rather than a ticket? The membership application form template takes the fee with a Payment block in the same way.
To spread the link, each form gets a QR code (PNG or SVG) for the flyer and a custom slug people can type, like this:
https://forms.hornetforms.com/f/spring-workshop?source=flyer
A public sign-up link attracts bots too. Every plan includes a honeypot field, a time check and rate limits, and our guide on how to keep bots out of your forms explains each one.
On the Free plan, the form shows a small "Made with HornetForms" badge. Pro and Business remove it and let you add your logo and a cover image, and the pricing page lists what each plan includes.
Keep the guest list and the money in one sheet#
Every event registration form with payment ends in two lists: who's coming and who has paid. The free event registration tracker opens in Excel and Google Sheets. Export your responses as CSV, paste the file into the Responses tab, and type your capacity into the yellow cell. Use the CSV export: it carries the payment columns, like Payment status, Payment amount and Refunded amount. There's a CSV with just the column headers too, and one for a form without payments.
The sheet does the counting:
- Headcount shows registrations, guests, people holding a place and places left, plus a count per registration type.
- Money totals each payment status and works out what you've collected, minus refunds. Amounts are what people paid, before Stripe's processing fees.
- Catering counts each dietary option for people and their guests, and lists the notes for the caterers.
- Door list prints names A to Z with the guest, registration type, payment status and an empty "Here" column to tick on the day.
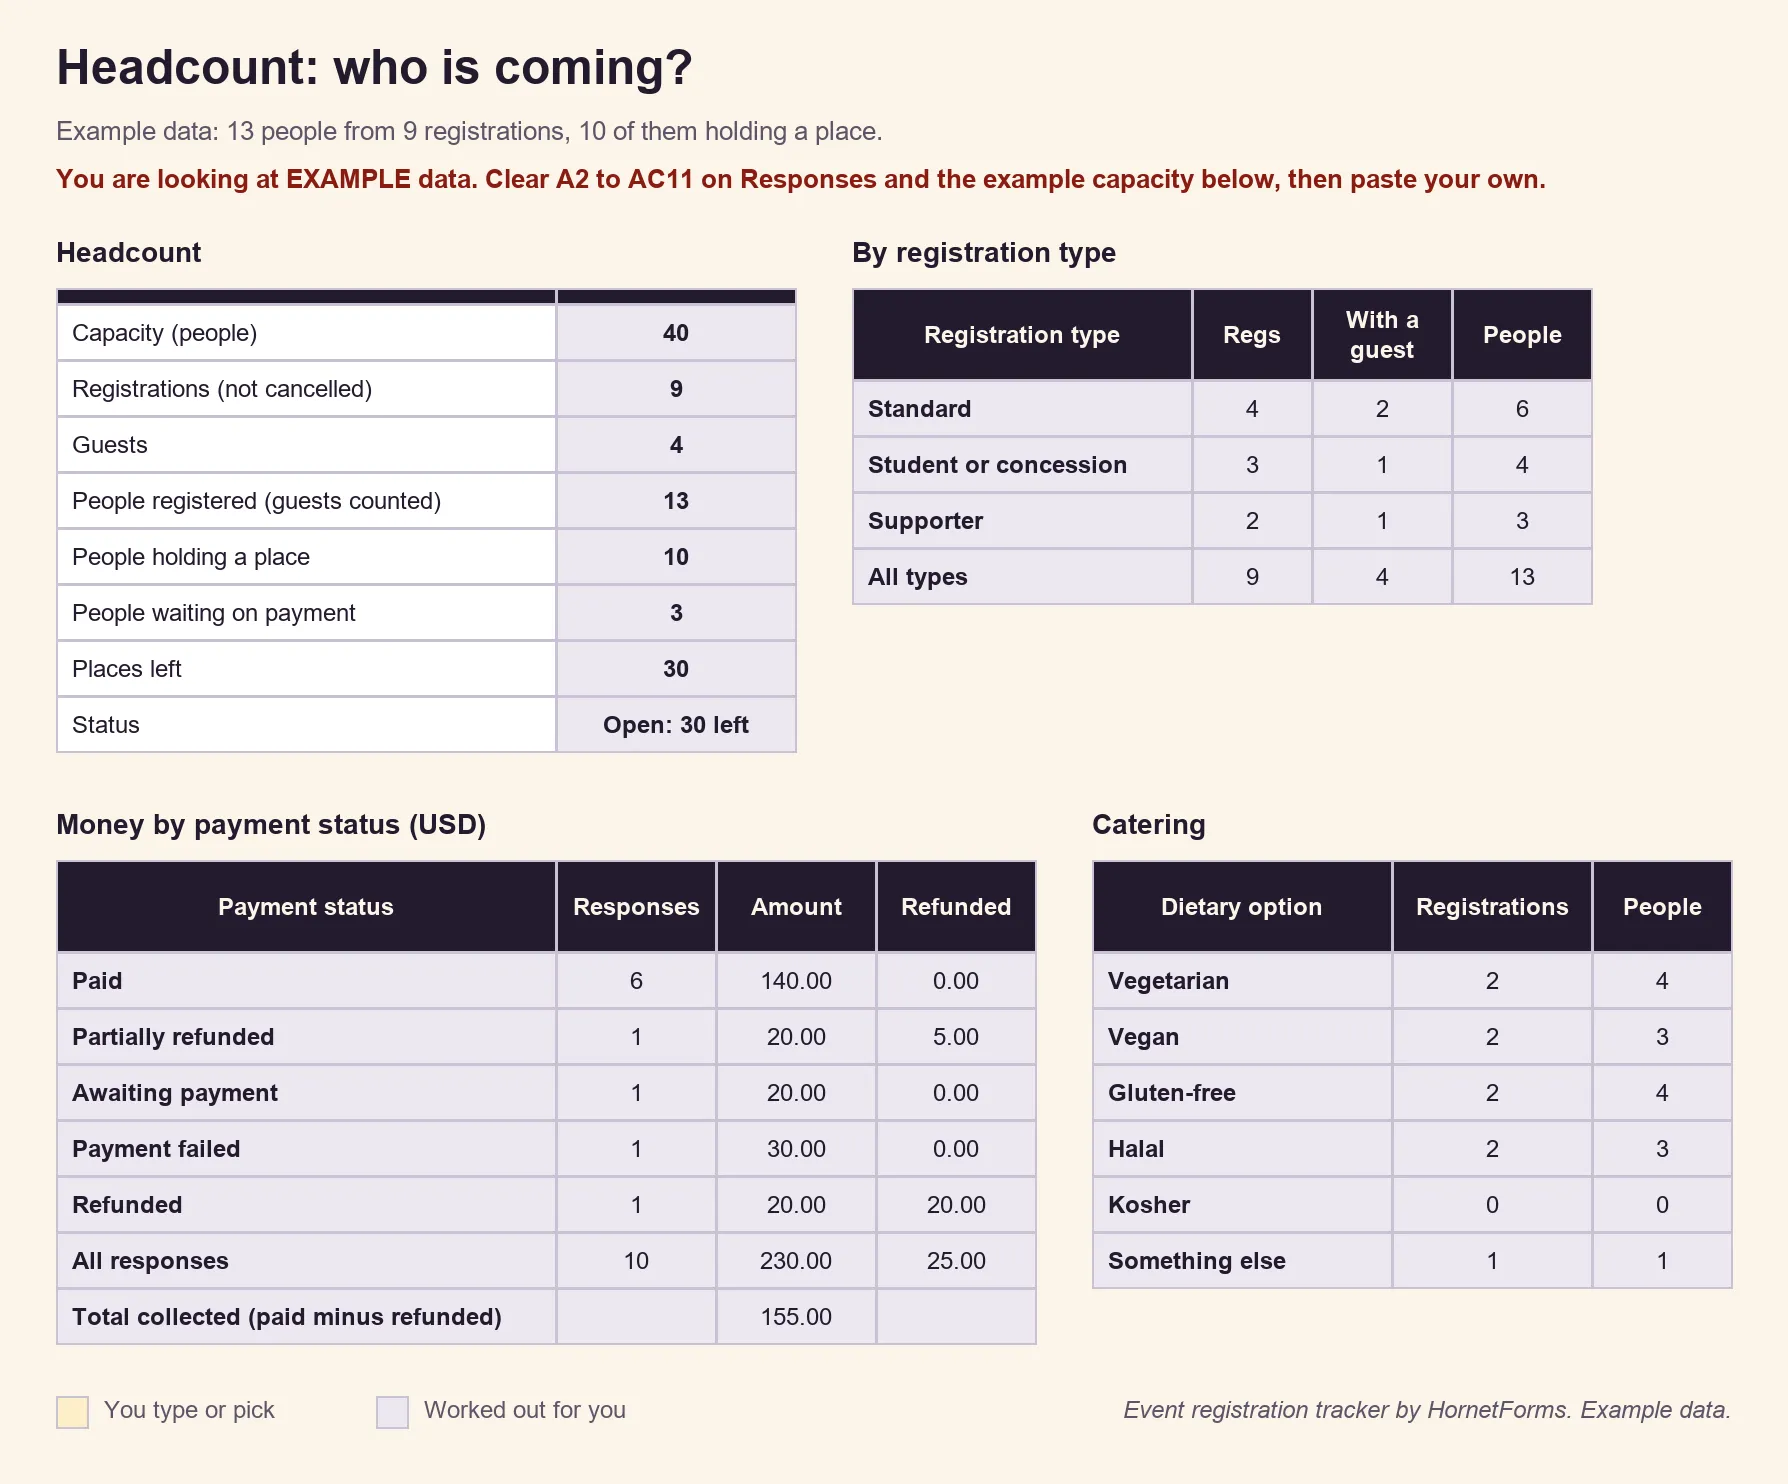
EXAMPLE data only. The names, prices and the capacity of 40 are samples, so clear the example rows and paste your own export.
Export again after each wave of sign-ups and paste over the old rows. HornetForms has unlimited responses on every plan, so the only limit is the one you set, never a plan's response cap. For the confirmation, turn on the respondent email and write your own subject and text. It goes out only after the payment goes through.
Open registration this week#
Copy the template, set your prices and add the Payment block, and your event registration form with payment is ready. Pick a response limit that leaves room for guests. Then print the QR code for the flyer and keep the tracker open as people sign up. Sign up for free and open registration for your next event today.