
On this page
You need answers from a group of people: a class, a team, your customers or the parents on a mailing list. Learning how to make a Google Form is a quick way to get there. You build the form in your browser, send a link, and the answers come back to you as charts or rows in a spreadsheet.
This guide walks through how to make a Google Form from a blank page to the first response: questions, types, sections, theme, sending, answers and a closing time. Then it builds a short customer survey as a worked example. Every Google Forms step below comes from Google's own Docs Editors Help pages, and we quote the button names exactly as Google writes them. We checked those pages on October 28, 2026. Google changes its menus from time to time, so the linked page always has the latest version.
Before you start#
Google describes the tool in one line: "You can use Google Forms to create online surveys, quizzes, and forms, send them to others to fill out and then analyze their responses in real time" (Google Docs Editors Help, How to use Google Forms, checked October 28, 2026). Making a quiz? See our guide on how to make a quiz on Google Forms.
Two things help before you work out how to make a Google Form for your own job:
- Know where it saves. Google's help page says: "When you create a Google Form, it's saved in Google Drive." So you build it in the Google Account you use for Drive. Still picking a tool? See whether Microsoft Forms or Google Forms suits your job.
- Know what the form is for. Write one sentence: "This form lets [who] tell us [what], so we can [do what next]." That sentence decides which questions belong. The free planning worksheet at the end of this post starts with that line. Need questions to put in it? See our Google Forms examples.
How to make a Google Form in eight steps#
Here's how to make a Google Form at a glance. The sections below take each step in turn, with Google's own wording.
| Step | What you do | Where it lives in Google Forms |
|---|---|---|
| 1. Create | Start a blank form and name it | forms.google.com, Blank form |
| 2. Add questions | One question for each thing you need | Add, then pick the type |
| 3. Required | Mark the answers you must have | Required on each question |
| 4. Sections | Group questions, and skip what doesn't apply | Add Section, Go to section based on answer |
| 5. Theme | Colors, header image and fonts | Customize theme |
| 6. Preview and settings | Try it once, then check the settings | Preview, Settings |
| 7. Publish and send | Link, email or embed | Publish, Share, Embed HTML |
| 8. Responses | Read answers, link a spreadsheet | Responses, Link to Sheets |
Step 1: create the form#
The first step in how to make a Google Form is a blank form. Google's steps are short: "Go to forms.google.com. Click Blank form. Name your untitled form." You can also start from Google Drive (in the top left, click New, then Google Forms) or from a spreadsheet in Google Sheets (click Tools, then Create a new form). When you start from Sheets, Google says "the responses will be saved in a new sheet" (How to use Google Forms, checked October 28, 2026).
Step 2: add questions and choose question types#
To add a question, Google's help says: "On the right, click Add." Then, "To the right of the question title, choose the type of question you want" (Choose a type of question for your form, checked October 28, 2026). To change a question later, "click the text you want to change." A form can hold "up to 300 pieces of content, like questions, descriptions, images, and videos" (Edit your form, checked October 28, 2026).
Pick the type from the answer you want back. Here's what Google's question types page says each one does:
| Question type | What Google's help page says |
|---|---|
| Short answer | "Responders can find one line to write their answer in a few words" |
| Paragraph | "Responders can write long answers in paragraphs" |
| Multiple choice | "Responders can choose only one option" |
| Checkboxes | "Responders can select multiple answers" |
| Dropdown | "Responders can choose only one option" (from a list) |
| File upload | "You can ask the responder to upload a file in your form," and files go to "a new folder on Google Drive" |
| Linear scale | A rating on a scale that starts at zero or one and ends at 2 to 10, with "a label for each end of the scale" |
| Rating | A star, heart or thumbs up rating, "a whole number from 3 to 10" |
| Multiple choice grid, Checkbox grid | A grid of rows and columns, "often used to rate a category of options" |
| Date, Time | A date in "mm/dd/yyyy format," or a time or a duration |
Multiple choice and Checkboxes can include "Other" as an option, so people can type their own short answer. If you want help choosing between types in general, our guide to every question type and when to use it covers the thinking behind each one.
Step 3: make questions required#
Some answers you must have, like an email address for a reply. Google's help page says: "To prevent people from not answering, turn on Required" (Edit your form, checked October 28, 2026). Keep it to the questions you truly need. Every required question is one more reason for someone to stop halfway.
Step 4: add sections (and skip the ones that don't apply)#
Google notes that "Sections can make your form easier to read and complete." To add one: "Click Add Section. Name the new section." A form can have "up to 75 sections" (Edit your form, checked October 28, 2026).
Sections also let people skip questions that don't fit them. Google's steps: at the bottom right of a question, click More, then Go to section based on answer. This option works on Multiple choice and Dropdown questions. You can also send people straight to the end, because "If you want the survey to end based on an answer, you can also choose Submit form" (Show questions based on answers, checked October 28, 2026).
Step 5: change the theme#
Google's help page lists the steps: "Click Customize theme." Under "Color," you can pick a theme color and a background color. Under "Header," you can click Choose image to add your own photo. Under "Text," you can change the font style for headers, questions and text. When you're done, click Close (Change the theme or font of your form, checked October 28, 2026). For more on header images, fonts and contrast, see how to customize Google Forms.
Step 6: preview it and check the settings#
Testing is the part of how to make a Google Form that people skip. Google's help puts Preview at the top right of the editor. Open it and answer your own form once, start to finish, then again on your phone.
Then open Settings at the top. Google's sharing page lists four settings worth a look before you send (Publish & share your form with responders, checked October 28, 2026):
- Limit to 1 response. Google's help lists it under "Limit users to one response."
- Allow response editing. Google: "You can choose whether someone can edit a response they've already submitted."
- Confirmation message. "You can customize the message people get after they submit the form." Tell people what happens next.
- View results summary. Google warns that summaries "are visible to anyone who can respond to the form," so leave it off unless you want everyone to see the answers.
To collect email addresses, Google's responses page says to choose Verified or Responder input under "Collect email addresses" (View & manage form responses, checked October 28, 2026).
Step 7: publish and send it (link, email or embed)#
On Google's current help page, publishing comes first: "When you publish a form, responders can access it. If the form is unpublished, responders with the link can't access it." The steps start with "At the top right, click Publish." Under "General access," you can open it to "anyone with a link" (Publish & share your form with responders, checked October 28, 2026).
Then pick how to send it:
- A link. At the top right, click Share, then Copy responder link. Once the form is published, you can tick "Shorten URL" for a tidier link.
- Email. Click Share, enter people's names and tick the box next to "Notify People," then click Send.
- Embed it on a website or blog. "At the top right, click More menu. Select Embed HTML. To copy the HTML that shows, click Copy. Paste the HTML into your website or blog."
Step 8: read the responses#
Once your form is published, answers appear in the form itself: "At the top, click Responses." Google's page lists two views: Summary for responses by question and Individual for responses by person. Google notes that "The 'Summary' tab displays on a form only when there's one or more responses" (View & manage form responses, checked October 28, 2026).
Want an email when someone answers? Google's steps: "At the top of the form, click Responses. Click More. Click Get email notifications for new responses."
How to make a survey in Google Forms (a worked example)#
Here's how to make a survey in Google Forms for a small café that wants feedback after a visit. Six questions in two sections, about two minutes to answer.
Section 1: About your visit
- How often do you visit? Multiple choice: First time, A few times a month, Every week. Required.
- What did you order? Checkboxes: Coffee, Tea, Pastry, Lunch, plus "Other."
- Overall, how satisfied were you? Linear scale from 1 to 5, labeled "Not at all" and "Very." Required.
- Would you like to tell us more? Multiple choice: Yes, No. Then use Go to section based on answer: Yes goes to Section 2, No goes to Submit form. Required.
Section 2: Tell us more
- Question 5: What's one thing we should change? Paragraph.
- Question 6: Your email, if you'd like a reply. Short answer, not required.
Finish with a Confirmation message like "Thanks! We read every answer each Monday." Then publish it, copy the responder link, and put it on the receipt or a card by the register.
That's the pattern for most surveys: a few closed questions people can tap, one rating, and one open question for people who have more to say. When the answers come in, our guide on how to analyze survey data in Excel or Google Sheets shows how to count, average and chart them.
Collect data with Google Forms (responses and the linked spreadsheet)#
Many guides on how to make a Google Form stop at sending, but the answers are the point. The Summary charts are handy for a quick look. For sorting, filtering and sharing the raw answers, send them to a spreadsheet. Google gives two ways in:
- Link to Sheets. "At the top of the form, click Responses. At the top right, click Link to Sheets" (View & manage form responses, checked October 28, 2026).
- Select destination for responses. From Responses, Summary, click More, then Select destination for responses. Choose "Create a new spreadsheet" or "Select existing spreadsheet," then click Create or Select (Choose where to save form responses, checked October 28, 2026).
Google's page adds that "Google Sheets automatically puts your data in a table." Plan who sees the sheet, too. Google notes: "When you create a new response spreadsheet, form collaborators automatically get access to it," and that you change access "on both the form and the linked sheet separately." Want to add up the answers? See can Google Forms calculate totals.
Prefer a file? From Responses, click More, then Download responses (.csv). If your team works in Notion, see how to send Google Forms to Notion.
Good to know: Google's pages say that if you unlink a spreadsheet, "New responses won't be sent to the spreadsheet, but your current data remains intact." You can reconnect it later with Select destination for responses.
Close the form at a set time#
When you make a Google Form for something with a deadline, like an RSVP or an application round, you can set it to close by itself. Google's steps, from its responses page (View & manage form responses, checked October 28, 2026):
- "In a published form, at the top right, click Published."
- Under "Accepting responses," click Set close date or response limit.
- To close on a date: "Under 'On a date,' click Choose date and time. Select a date. Click OK."
- To close after a set number of answers, select After a number of responses and enter the maximum.
- To change what people see once it's closed, edit the message under "Responders will see this message when the form is closed for responses," then click Save.
To close it right away instead, turn off Accepting responses. Write a closed message that helps, like who to contact if they missed the deadline. For a sign-up with a fixed number of spots, see how to set up a first come, first served sign-up form.
Share it as a QR code#
A link suits email and chat. For posters, flyers and tables, a QR code works better. Copy the responder link (step 7), then turn it into a code. Our guide on how to make a QR code for a form covers making one for a Google Form, where to put it and how to test it before you print.
When another form builder fits better#
Once you know how to make a Google Form, you'll find it suits a lot of jobs. If you're weighing other tools for a particular form, HornetForms is one option. If you need to take money in the same step, see our guide to a Google Form with payment. Its Free plan is free forever, people answer without an account, and every plan includes unlimited responses within fair use. Our Google Forms vs HornetForms post compares the two job by job, and Typeform vs Google Forms covers that pairing. The pricing page lists what each HornetForms plan includes. For the planning side that works in any tool, see how to create an online form in 7 steps.
Plan your Google Form with the free worksheet#
The free Google Forms planning worksheet (PDF, US Letter) follows this guide from purpose to closing time. Also in A4 PDF and as an editable Word file.
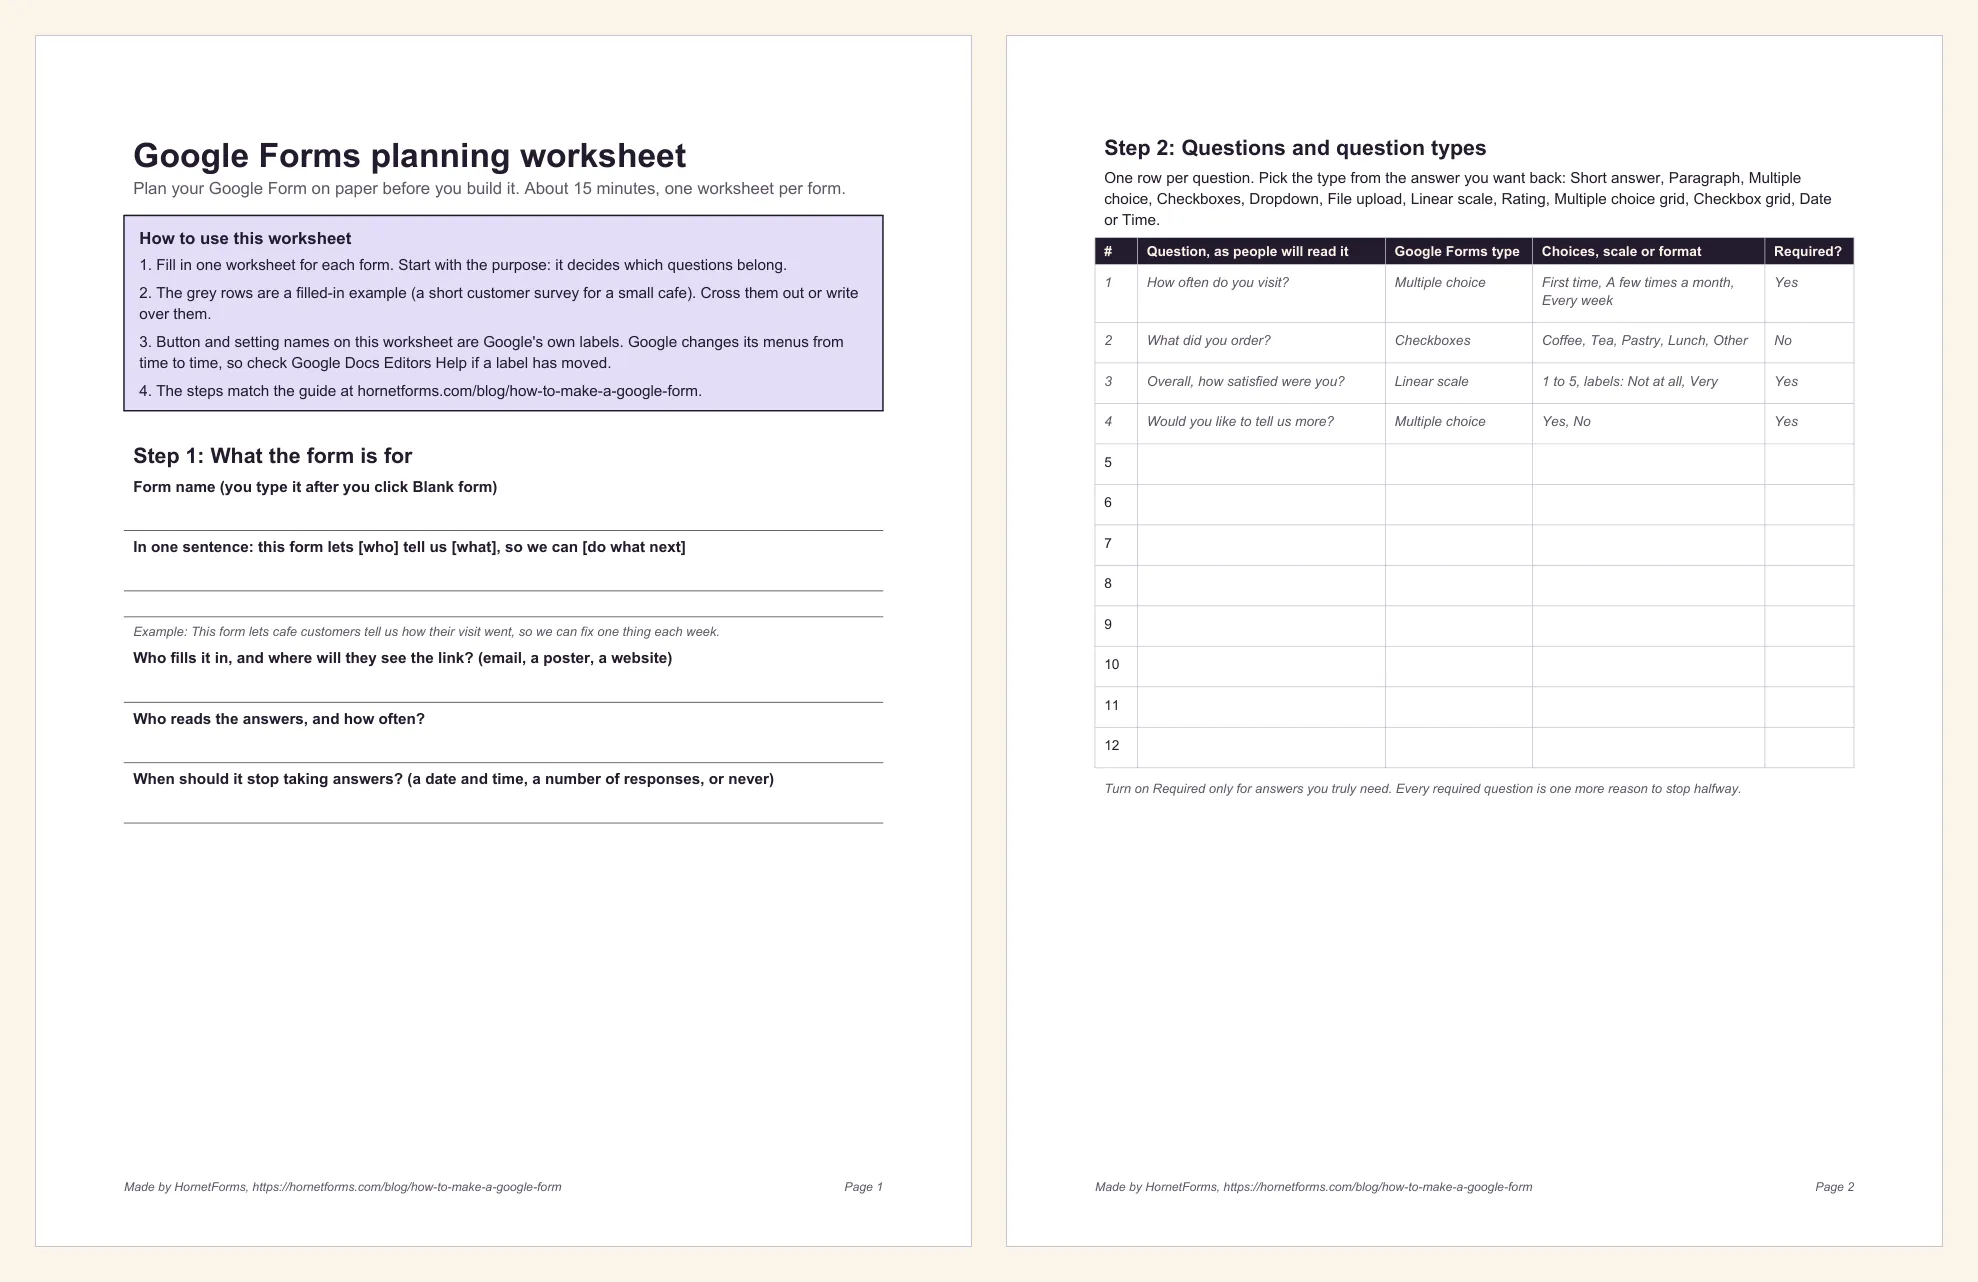
Inside you'll find:
- Purpose: the form name, one sentence on what it's for, who fills it in and when it should close.
- Questions: a 12-row table for each question, its Google Forms type, the choices or scale, and whether it's required.
- Sections: a table for each section and where people go next.
- Theme and settings: tick boxes for the settings in step 6, plus your confirmation message.
- Sending and answers: where you'll share the link, email or embed, and where the answers go.
- Closing time: on a date, after a number of responses or by hand, plus the message people see once it's closed.
- Test log: 10 checks to run before you send it.
Grey rows show the café survey from this post, filled in. Fill in one worksheet each time you make a Google Form. It takes about 15 minutes and saves a lot of "wait, why did we ask this?" later.
Make your first form today#
Now you know how to make a Google Form from a blank page to a closed form. Write the purpose, add the questions and group them into sections. Then pick a theme, preview it, publish it and link a spreadsheet. Plan it on the worksheet first and the build goes quickly. And if you'd like to try another builder alongside it, sign up for free and build the same form in HornetForms.
Google Forms, Google Sheets and Google Drive are trademarks of Google LLC. HornetForms is not affiliated with, endorsed by or sponsored by Google. Steps quoted from Google Docs Editors Help, checked October 28, 2026.